GA4 is well and truly upon us. At the time of writing this there is just over 6 months left of Universal Analytics, the version of Google Analytics we’ve been used to for the last 15+ years. It’s time for change.
I recently spoke to a client who had 10+ years’ worth of data in Universal Analytics for their membership website. And guess what? There was not a single event, goal or conversion tracked.
Nothing.
Not because this website wasn’t converting, because the website owner never bothered to setup Google Analytics beyond what it gave by default.
The client simply did not understand what Google Analytics was capable of tracking so they ignored the blank reports and went about their day.
Major marketing facepalm moment.
🤦🏻♀️🤦🏻♀️🤦🏻♀️
Of course, none of this data can be tracked retrospectively so that’s a serious missed opportunity to better understand how visitors engage with your website.
Along comes Google Analytics 4 (GA4) with its pre-built event tracking ready to go.
Many of those users with blank event/goal reports for the last 10 years must be scratching their heads after launching GA4 for the first time.
What are GA4’s Events?
GA4 tracks these events by default if you have Enhanced Measurement enabled:
- page_view
- scroll
- click
- file_download
- view_search_results
- video_start
- video_progress
- video_complete
In the past, you had to manually configure these events (except for pageview) to tell Google Analytics what to record. Now, it records all of these events without you having to do anything.
But, there’s something that’s not so obvious upon first inspection, you can send additional data to Google Analytics alongside these built-in events. This is extremely important if you want to add context and give more meaning to your data.
You can also add more events using Google’s list of recommended events and create custom events in addition to these default ones.
Let’s stick with these built-in events for a moment, events such as click, file download and site search are great, but they don’t tell us what was clicked on, what file was downloaded and what the user searched for.
Here’s where custom parameters and custom dimensions come in. We need these parameters to give us more context to this data. Why should we care if someone clicked on a link, button or icon on our website if we don’t know what they clicked on?
These new custom dimensions replace the less flexible event-based dimensions in Universal Analytics:
- Event Category
- Event Action
- Event Label
- Numeric Event Value
These are the methods I’ve used to customise the default events in Google Analytics 4 👇🏻
SIDE NOTE: These parameters will only appear in your GA4 reports if you create a matching custom definition for them in GA’s Admin area. Read instructions on how to do this at the end of the article.
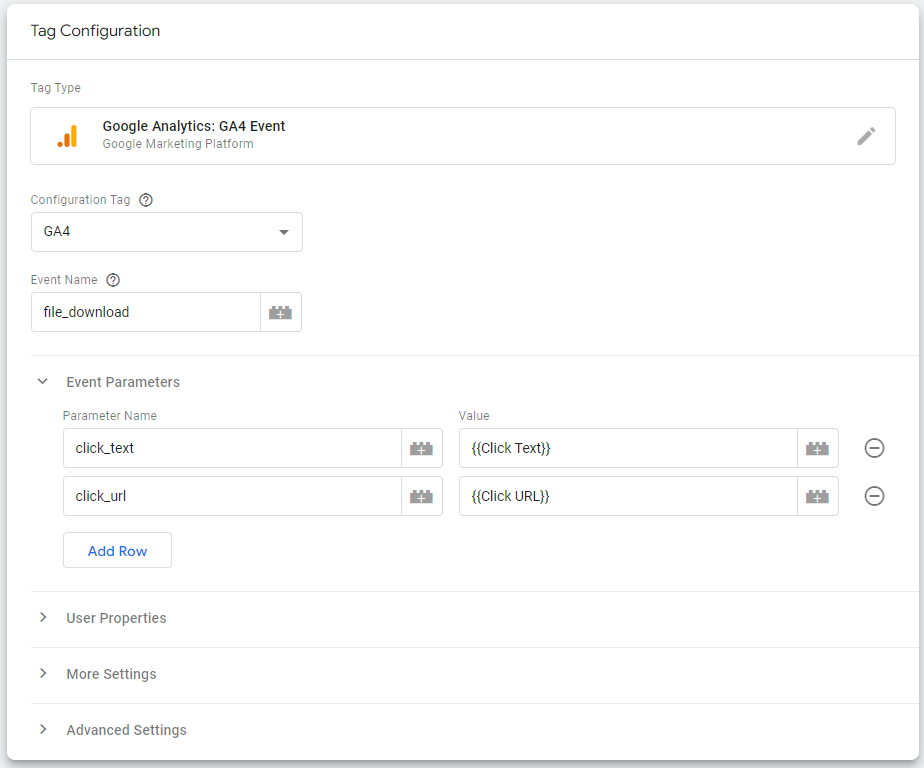
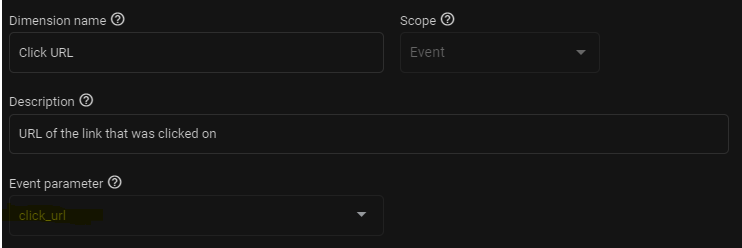
1. Click Text & Click URL Parameters
This gives so much more context to that general “click” event in GA4.
Firstly, it tells you which URL was clicked on. Secondly, by measuring the click text too, you can measure the effectiveness of different calls to action across your site.
Using Google Tag Manager, this is how I configured the parameters to send alongside the ‘click’ event:
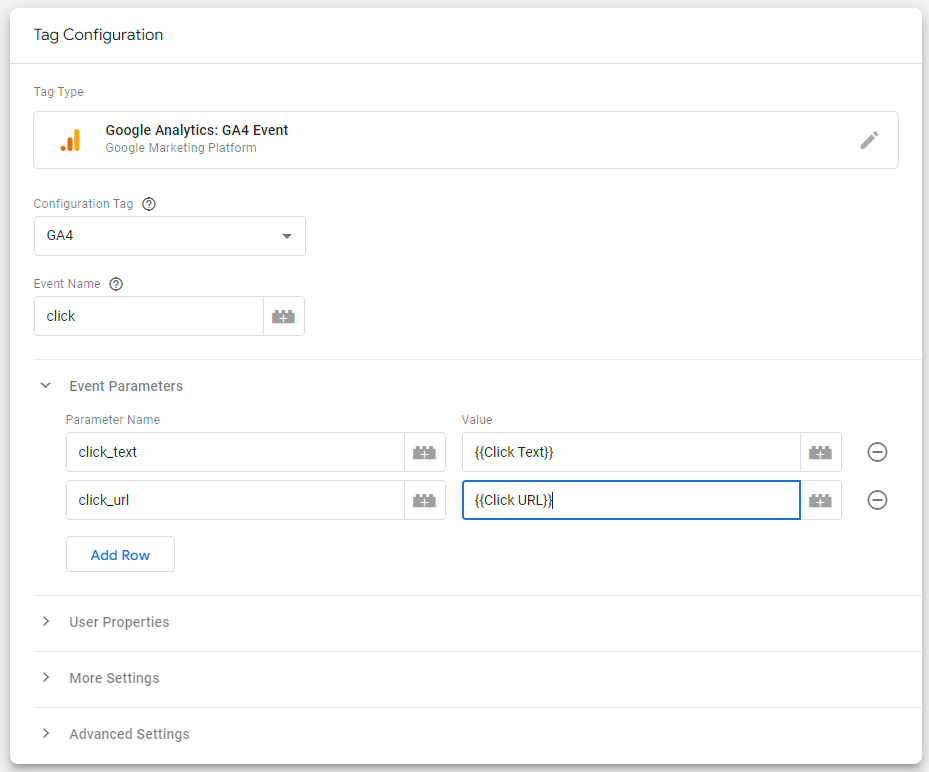
This will send the URL that was clicked on and the text that was clicked on along with the ‘click’ event.
SIDE NOTE: The click URL data is collected automatically using the link_url parameter, but you still need to add link_url as a custom definition in GA4. The click text is not automatically collected by default. I created my parameter for click_url before I discovered the default one provided by Google.
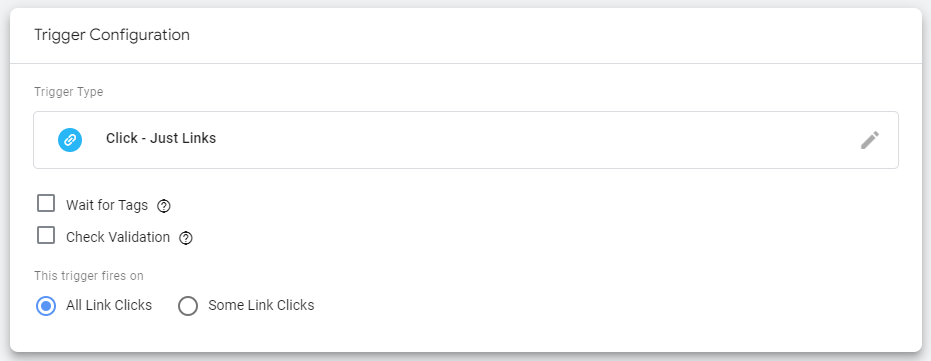
This event should be triggered on Link Clicks > All Link Clicks or you could set this to some link clicks to only track these parameters on certain links.
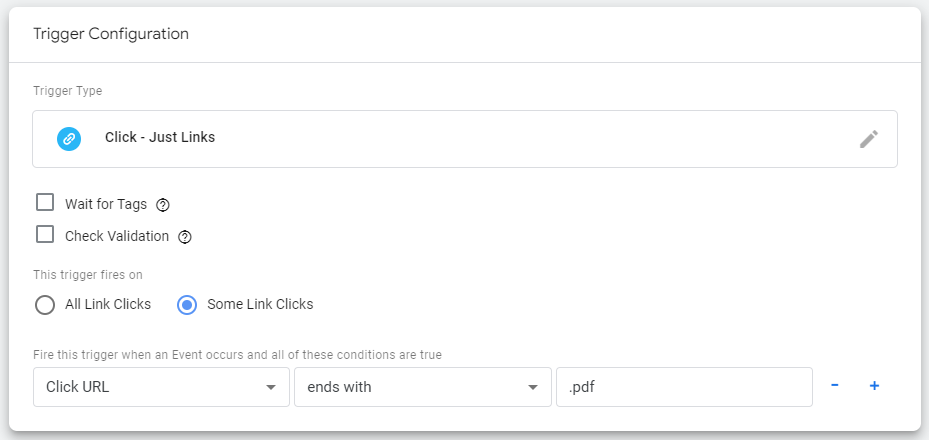
2. File Download URLs and Click Text
This is the same as above, except for the file_download event instead of the click event.
If your website has files for visitors to download, you’ll want to know which files are being downloaded the most so you can create more engaging content for your visitors.
To trigger this, you’ll need to use Some Link Clicks with a Click URL that ends with .pdf or other type of file extension:
3. Scroll Depth Percentage
Tracking scroll depth percentage can give an understanding of how interested and engaged users are with the website’s content.
A high percentage indicates that users are scrolling through a lot of the content, which can suggest that they are more invested in the website.
On my website, I track scroll depth in 4 increments:
- 25%
- 50%
- 75%
- 100%
I also used to include a 10% and 90% measurement too, but found it excessive and no more useful than tracking 4 simple increments.
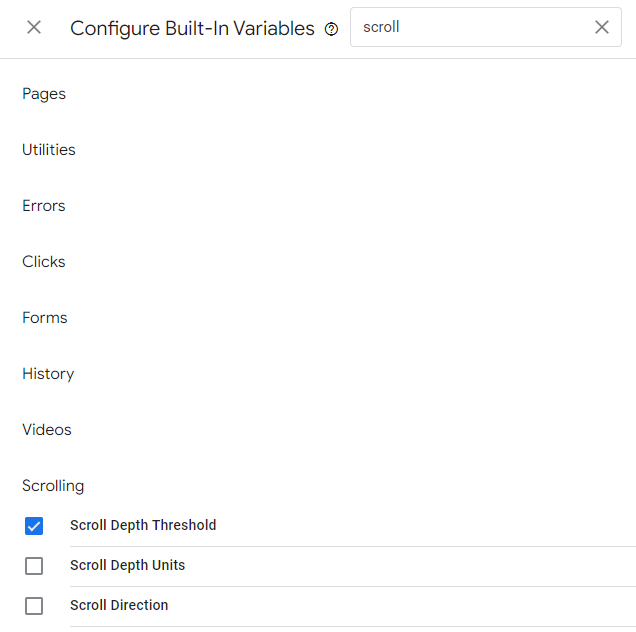
GA4 already tracks an event called ‘scroll’ but it doesn’t give much more information about it. You can add custom parameters to this event using Google Tag Manager.
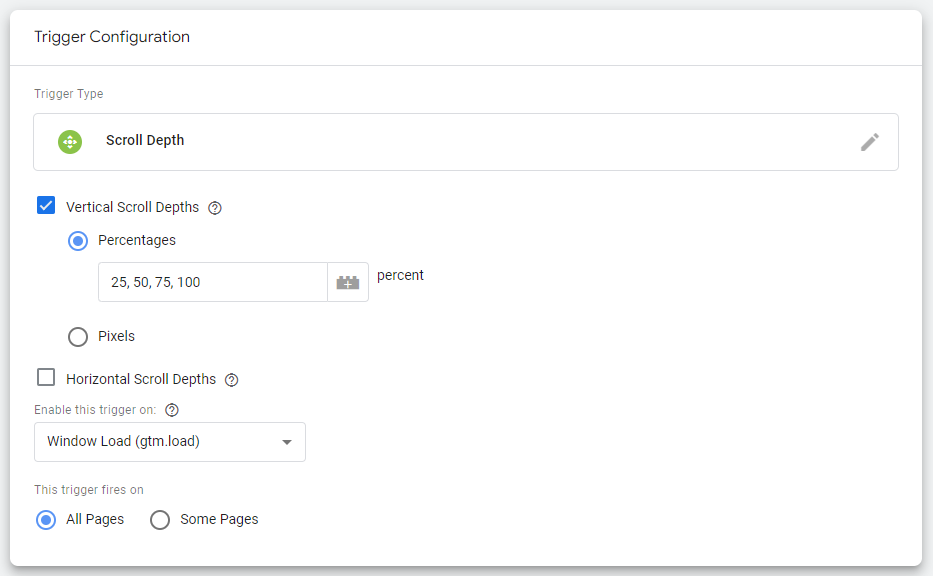
Start by creating a variable. Do this by navigating to Variables > Configure > Check ‘Scroll Depth Threshold’
Next, create a new GA4 Event tag and name sure the event name is scroll using all lowercase. Add a custom parameter called scroll_depth and enter the Value as {{Scroll Depth Threshold}}%_scroll.
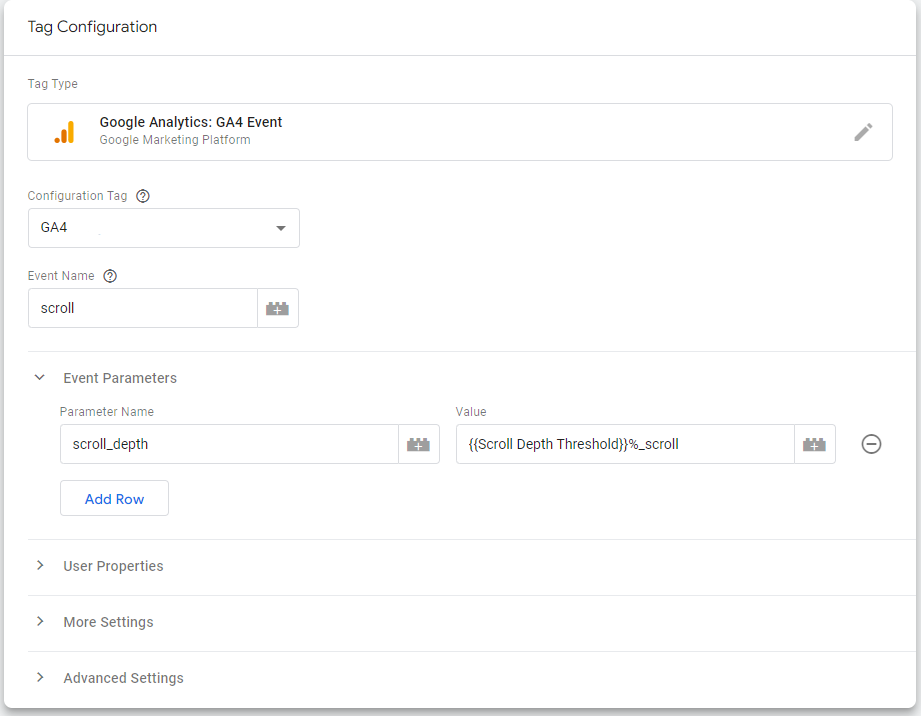
For the trigger, set it up exactly like the image below using a comma separated list of percentages that you wish to track as event in GA4.
In this example I have used 25, 50, 75, 100 but you can use your own incremental values between 1-100.
4. Video Plays – Video Title & Duration/Percentage Watched
“Embedding a video on your website makes people stay on the page longer!” You’ll hear this tip a lot from digital marketers – but how do you know that it’s true?
Google Analytics 4 automatically tracks video plays of videos embedded into your website, but there’s more useful information you can collect here.
Tracking which videos visitors are watching on your website, and the watch time duration can be extremely useful for understanding how engaged users are with your content. Knowing which videos are being watched and for how long can help you understand which videos are resonating with your audience and which ones are not.
For example, if you notice that a certain video has a high watch time duration, it could indicate that the video is informative, entertaining, or otherwise valuable to your audience. On the other hand, if you notice that a video has a low watch time duration, it could indicate that the video is not engaging or relevant to your audience.
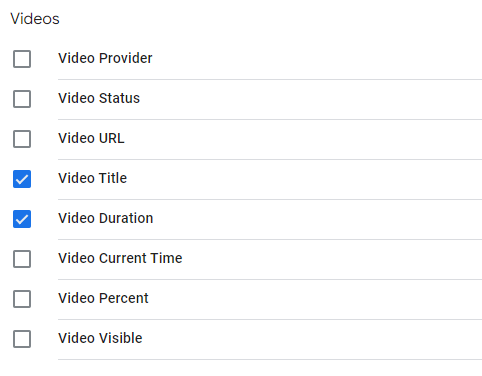
First, you’ll need to configure 2 variables in the same way that you did for the {{Scroll Depth Threshold}} variable.
Navigate to Variables > Configure > Check ‘Video Title’ and ‘Video Duration’:
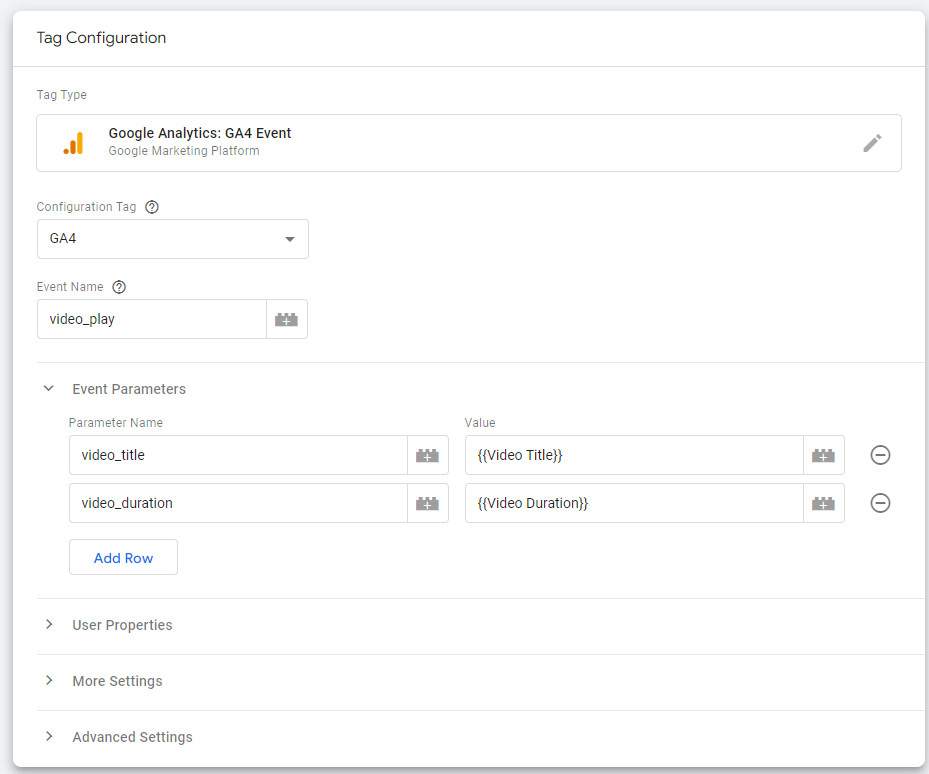
Here is my tag configuration for custom parameters to send alongside the video_play event. Make sure you’re using the event name video_play in lowercase text so that these parameters are sent correctly.
How To View Custom Parameters in GA4 Reports
Simply collecting this data is not enough. For some reason, Google, in their infinite wisdom, decided to add an extra step before seeing event parameters in your reports.
Navigate to the admin/settings area of your GA4 property, in the second column, go to ‘Custom Definitions’.
Here are my custom definitions from the events referred to in this article, but if you’ve never added any before, this table should be blank.
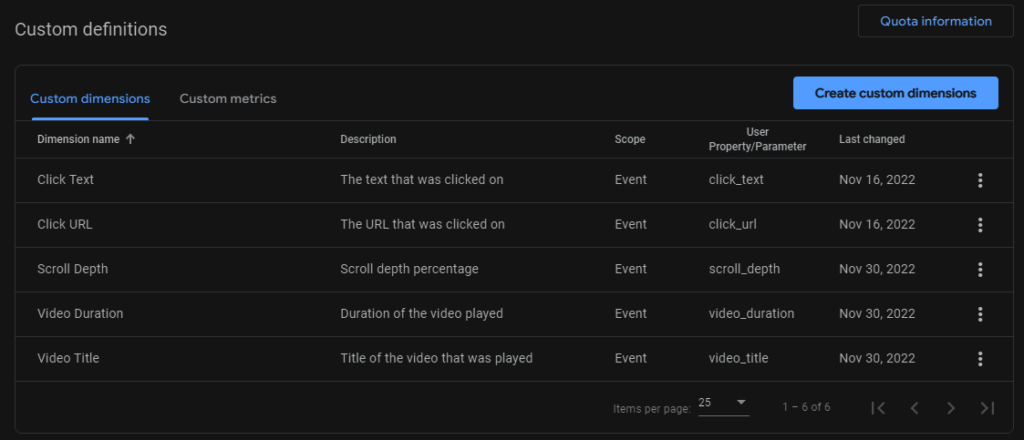
Click on ‘Create custom definitions’ to get started.
Final Thoughts
GA4’s default events are an exceptionally powerful tool for understanding your website’s performance, but making a few simple adjustments can take your analytics to the next level.
By making these small adjustments and adding custom definitions, you’ll be able to gain deeper insights into your website’s performance and improve the user experience.
Remember, the key is to always keep testing, experimenting and optimising your content by drawing conclusions from your data. This is called making data-driven decisions about your content, and it’s what separates hobbyists from those serious about making money with websites.
If you have any questions or need further assistance, don’t hesitate to reach out to the GA4 community, there are lots of helpful resources out there.