I’ve been working with WordPress sites for over 7 years now. From large sites with thousands of pages to tiny 5-page business websites, I’ve made so many mistakes over the years and I’ve seen so many others make the same, or very similar mistakes. This article is all about WordPress mistakes and how you can avoid them.

If you’re an affiliate marketer, business owner or blogger and your website uses WordPress, this is for you! Do you want to grow your traffic and improve your website? Maybe something is holding you back, or maybe you’re trying to correct your old mistakes from when you were getting started.
As I’ve said, I’m pretty experienced with WordPress but I’ve still made a tonne of mistakes myself, especially when I was just new to it. WordPress is an excellent Content Management System… but it’s not perfect.

It needs to be configured and set up in a unique way depending on the type of website it’s being used for, which leaves most beginners a bit confused. The process of setting up WordPress can be straightforward or extremely convoluted, depending on how digitally minded your are and how willing you are to learn.
Don’t worry! This article explains some of the most common WordPress mistakes and what you can do to avoid them. Why not open your website in a new browser tab to check whether these apply to you? This article is not aimed at absolute beginners, this is for those of you who already have a new WordPress site and want to grow or improve.
Mistake #1: Keeping Permalinks with the Date in the URL
The very first thing I always do without fail on a fresh WordPress installation is change the permalink settings to not show the date in the title.
There are at least 2 reasons why it’s a bad idea to have the date in the permalink (URL):
- It negatively effects content that you regularly keep up-to-date with fresh information. If you keep the date in the URL, then the URL will forever have the published date in it. In 5 years’ time, that won’t look so great. You can keep the original date on the page and in the meta data, but keep it out of the URL.
- The date makes the URL longer and uglier. Sorry if this seems petty, but aesthetics are everything and short URLs with fewer forward slashes are far preferable.
Visit ‘Settings’ in the left side menu and then choose ‘Permalinks’ to change this in one click.
‼ Be aware, if your site is established and has a lot of content, then all existing links will be broken by changing this setting!
Plan this carefully and setup redirects (301s) to the new address for each page.
That’s why it’s best to change this setting right at the start!
Mistake #2: Using WordPress.com instead of going Self Hosted
If you’re serious about your website or blog, then you’ll make the small investment and purchase affordable web hosting and a domain for a few quid a month.
Any serious blogger will grow out of the free version of WordPress or Blogger very quickly. It’s seriously worth spending the £20-30 per year to have your own hosting. That’s less than a night in with a Dominos pizza, seriously! It’s a no-brainer!
The absolute best web hosting is FlyWheel or WP Engine. But they come at a steep cost, which not every new business owner can afford, which is perfectly understandable. I recommend this premium hosting when you’re ready to scale your business but you don’t necessarily have to invest right away.
Siteground or Bluehost are the least expensive hosting options. It’s perfectly OK to get started with budget hosting and then migrate your website once it grows and starts earning money. Not everyone has a large budget to start with, so don’t feel ashamed about starting out with cheap shared hosting.
I’ve personally never had an issue with Bluehost, however, many others have terrible things to say about them, I just haven’t experienced it myself. With Siteground, their hosting is very fast and offers good performance, but their renewal prices are 3-4 times the introductory price!
Siteground has also penalised me for large volumes of traffic once my site started to grow, as I was using extra server resources I accumulated additional charges. This has not happened yet with Bluehost. I still host a couple of new sites over there.
I can also provide web hosting for bloggers and small businesses in South Wales. Please get in touch to discuss this further.
Mistake #3: Forgetting about Category Pages
Every time you create a new blog post ‘category’, WordPress will generate a feed containing every post within that category and give it a URL.
You can edit and customise these category pages, as they can and will be indexed by Google. Most bloggers put categories as menu items too, so as your website grows, start treating these pages as landing pages, highlighting your best content in each category.
These pages are automatically generated by WordPress, so there’s little room for customisation unless you’re comfortable editing WordPress theme files.
You can use a page builder, such as Divi Builder or Elementor to create landing pages for each category. Then, create a 301 permanent redirect from the default /category/ page to your newly designed beautiful landing page with a mixture of static and dynamic content. This is better for user experience and it gives you better control of the automatically generated category pages on your site.
Mistake #4: Forgetting to ‘noindex‘ all Tag and Date Archives
A CMS like WordPress keeps your blog posts nicely organised using categories and tags. It also creates a lot of files and redundant pages in the process.
Every single month has a page associated with it, so do individual tags. That means that if you’ve only used a tag once or posted a single blog post in a month, you’ll end up with pages for that tag and that month with only a snippet of a single post.
All of these pages are indexed in Google by default and could result in ‘skinny’ or ‘duplicate’ content. If you’re serious about your blog, you’ll want to avoid this. The popular (and free) Yoast Plugin can de-index these pages without you having to do anything significantly technical.
Or, don’t use tags at all ?♀️
Mistake #5: Installing Google Analytics Twice
I see this so so so often, especially with bloggers who want to show off their best stats. Unfortunately, so many bloggers rely on WordPress plugins to do anything remotely technical. Adding the Google Analytics code is a simple copy and paste job, yet many plugins take care of this for you so there’s often no need to copy and paste the code yourself.

If you happen to add the code yourself and use a plugin that does this for you, or you have two plugins doing very similar things, then you risk inserting the code twice. This means that your analytics will be hugely inaccurate.
The biggest giveaway is when bloggers share monthly “Income and growth” reports with their audience. These posts usually feature a boastful screenshot of their site’s Google Analytics for the past month. The bounce rate will be incredibly low, like <5% low.
No website has a bounce rate this low. People often vastly misunderstand what the bounce rate is – it’s a single page view without internal navigation – but that’s a topic for another article. Without knowing it, these bloggers are massively inflating their numbers. Or, in the case of bounce rate, deflating it.
A healthy bounce rate is 65 – 85% and that’s totally cool. The low bounce rate almost certainly means that the analytics code is installed twice. Also, page views reported under this scenario should be halved to allow for the inaccuracy.
Fortunately, you can easily test this on your own site using the Google Tag Assistant plugin for Google Chrome.
Mistake #6: Relying on Yoast’s Traffic Lights
Yoast is a great tool for WordPress users of all levels. It can:
- Generate an xml sitemap for your site
- Quickly verify your site with Pinterest, Google Webmaster Tools, etc
- Allow you to edit the Meta, Schema and OpenGraph data of each page and blog post
It also has a ‘traffic light’ feature that gives you a red/amber/green ‘SEO rating’ for each post. Whilst this does have its uses, you should not rely on a green light meaning that your post is fully optimised.
Yoast allows you to enter a keyword or phrase below your article and it gives you pointers to help you rank for that keyword. A blogger who I recently worked with was under the impression that whatever you typed into that box in Yoast gave a signal to Google that you’re aiming for that keyword. This blogger misunderstood the feature entirely and was using Yoast as a strategy to rank for broad phrases like “Winter Fashion Ideas” and she was disappointed with the results.
The Yoast Plugin does not tell Google anything about your keywords. It’s simply a guide for you to refer to.
The traffic light system also recommends some questionable practises, such as keyword density, as opposed to keyword variation (unless you pay for the ‘Premium’ version of the plugin and even then its rating system is just as dubious).
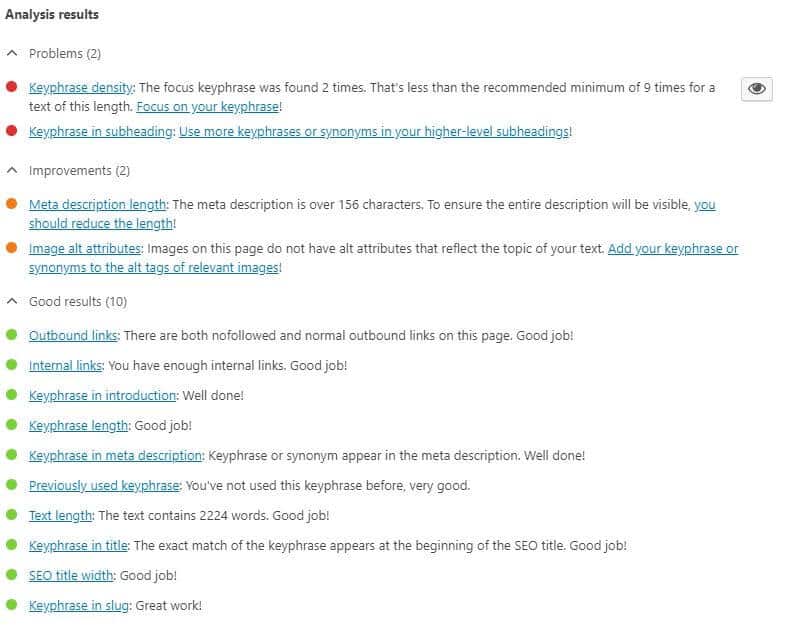
Here is a Screenshot of Yoast’s Traffic Light rating system for a standard blog post. This recommends using the keyword 9 times – I haven’t used this method since 2012. If the main keyword here was “best washing machines” then I would use “washing machines under £500” and “Best eco-friendly washing machines” etc as variations of the keyword instead of stuffing the phrase into an article for the sake of it.
Fortunately, you can make use of the other features of Yoast and turn the traffic light system off completely. If you choose to keep it on, then use your common sense instead of trying to get a green light on every single post. Stuffing keywords for the sake of it is not good practice, nor does it give a good user experience.
Mistake #7: Not making the most of Google Search Console for Enhanced Search Analytics
Everyone knows about Google Analytics, but not everyone has it configured correctly for what they want to track.
Most bloggers will benefit from Google’s Search Console (formerly webmaster tools) in order to actually find out the search queries that people use to find your site. Google Analytics usually says [not provided] in place of an actual keyword. This is for privacy, so anyone logged into Google won’t have their search terms reported in your Analytics dashboard.
However, Google Search Console can give you a much better insight into your search engine performance over time. It will also give you a list of queries that people use to find your website, which you can export and cross-reference with your posts.
I do this by pasting an entire article into one single cell in Excel, then in another column, paste in the list of all the keywords I’m ranking for.
I use a formula in Excel: =IF(ISNUMBER($A$1,B1),”Found”,”Not Found”) – this assumes your article text is in cell A1 and your list of keywords is in column B. Paste this formula in cell C1 and drag it down the entire list.
You can use this information to further optimise your existing posts for new keywords!
It’s easy to connect your site; visit this page, sign in and follow the instructions to verify your site.
Mistake #8: Not Realising that Page Titles and Meta (SEO) Titles are Different
I’ve seen people call give their blog posts titles like “Chapter 1”, “Chapter 2”, etc. This is nice, but it doesn’t tell the reader anything about the post. If SEO forms part of your strategy, then you need to work on your titles!
If you’re making a stylistic choice to make your blog about storytelling, that’s absolutely fine, but if you want people to find your stories in search engines, you’ll have to optimise your page titles.
It’s possible to give your post a title that will be displayed on the page, and a different variation of the title for Search Engine results and social media shares. You can do this with the Yoast plugin if your theme doesn’t support it. This is one of the better features of Yoast I was talking about earlier!
Mistake #9: Not having a Privacy Policy and/or Full Affiliate Disclosure
All WordPress sites should have a basic Privacy Policy page linked to in the footer. WordPress even generates one for you with some basic legal content. You should see it in your ‘pages’ list. You can edit the Privacy Policy to include things like:
- Newsletter sign up forms
- Comments
- Contact forms
- Google Analytics
- Advertising (AdSense / MediaVine / Ezoic)
- Affiliate Tracking
You need to refer to these in your Privacy Policy. I’m not a lawyer, so do your own research and seek your own advice.
You also need a disclaimer if you’re doing Affiliate Marketing. This needs to be clear and visible to the reader before they click on the affiliate link. It should be visible on every page that has an affiliate link on it.
Personally, I inserted some code into my theme’s header.php file, so that it does this automatically for every new blog post and I don’t have to worry about it!
If it changes, I only have to change it once! Like magic!
Mistake #10: Editing Theme Files without Experience
Speaking of editing php files, I do this because I have many years’ worth of experience with WordPress. I also use child themes. I copy certain parts of my theme into a new folder under the theme’s parent folder in FTP, but you could use a plugin instead.
The problems with editing raw theme files in the parent folder occur when the theme needs an update. Every file is replaced, as are the edits your made to the theme files. Gone. Using a Child Theme avoids this, but you still need to know what you’re doing.

Hire a developer or an expert who can configure a child theme for you. Don’t risk breaking your site without a clue how to fix it. I can help you with you WordPress issues, get in touch to discuss your needs.
Mistake #11: Not Backing Up
*sigh* I’ll keep this one short – just back your site up. Trust me.
Consider the implication of losing everything, now go and install a backup plugin.
I highly recommend UpDraft Plus, it’s free and easy to set up.
Mistake #12: Putting SEO above User Experience
This relates to the poor practice encouraged by Yoast with their traffic lights (see point #6). User experience should be your top priority.
Your blog posts should flow nicely. Remember, it’s a human reading your content. The Google algorithm will be able to tell if someone leaves straight away because your title and meta description was nothing but clickbait.
Always put the reader first when you’re writing for SEO. Add value, don’t stuff keywords!
Mistake #13: Forgetting to ‘sponsored‘ or cloak Affiliate Links
It is Google’s policy that paying for backlinks (links to your site from other sites) is not allowed. Every time another website links to yours, Google recognises that link as a sort-of small endorsement. The more links you have, the more likely you are to outrank other sites on the results page. Links from more established sites are worth more than others.
It’s not fair for one site to outrank another because they’ve paid for thousands of links. However, legitimate online advertising and affiliate marketing opportunities exist and they all require links. The “sponsored” attribute was introduced by Google for publishers to tell them “this link should not be followed, therefore do not give this page any search engine credit for this link”.
You can add the “sponsored” attribute within the <a> tag. A web link in HTML looks like this:
<a href=”https://www.something.com” target=”_blank”>Click here</a>.
You can add rel=”sponsored” like this:
<a href=”https://www.something.com” target=”_blank” rel=”sponsored”>Click here</a>.
It’s worth noting that for all pages that open in a new tab, WordPress will automatically add rel=”noopener” to the HTML. You can simply add a space and sponsored to the end, like this:
<a href=”https://www.something.com” rel=”noopener sponsored” target=”_blank”>Click here</a>.
It’s best practice to use the sponsored attribute if the link is paid-for in some way, or if you just don’t want to endorse the site you’re linking to. The NoFollow plugin for Google Chrome will highlight all no followed links on a page. This is handy for auditing your own site and checking for no followed links.
Alternatively, you can cloak links with another bloated plugin, but check the terms of your affiliate agreement first as some retailers specifically forbid cloaked links or URL shortening.
New link attributes – September 2019
Google announced in September 2019 that two new link attributes are being introduced. These are sponsored and ugc (user-generated content). UGC will be used for comments and forum posts, whereas sponsored could be used for sponsored articles and affiliates. There’s no need to change existing links as the sponsored attribute is still supported, according to Google.
Mistake #14: Uploading REALLY Large Images
New bloggers are often unaware of this. You should not upload original versions of photos straight from your phone or camera. These photos will have a large file size and will make your page very slow to load.
You should use a free image editor, such as Pixlr or Canva to create images with a maximum width of 800px for blog posts or about 1080px for a full-width image. Your WordPress theme will have recommended sizes for the featured image, which you should stick to in order to avoid cropped or distorted pictures.
Use JPEGs instead of PNGs for faster loading time, unless you need a transparent background. You should compress images before you upload them for better performance. Faster loading = better performance in Search Engines.
You have a few different options to compress your images:
- Manually run all images through tinyjpg.com before uploading them
- Use a WordPress plugin such as Smush or EWWW Image Optimiser
- Reduce the quality in PhotoShop to approximately 75%
This will make images about 20-50% smaller in file size without reducing their quality. In turn, this means your page will load much faster, giving you bonus points with your readers and Google.
Mistake #15: Too Many Plugins
Remember when you got your first Smart Phone? Did you go straight to the App Store and download all the novelty and productivity apps under the sun? Do you use precisely none of them these days?
Plugins on WordPress are very similar; there are thousands to choose from but you only need a small handful. I’ve mentioned various plugins in this article so far, but I’ve also stated that there are ways of doing things without involving plugins, if you know how.
Many bloggers who are new to WordPress will be attracted by all the shiny free plugins, but you should definitely err on the side of caution before installing every plugin. You should consider:
- Does this plugin do something very similar to another plugin?
- Is this plugin up-to-date and compatible with the latest version of WordPress?
- Can I add this functionality without needing a plugin?
- Does this plugin have plenty of unbiased reviews?
- Is there plenty of documentation available in case something goes wrong?
- Do the developers provide technical support?
You’ll also need to make sure you keep any plugins up-to-date as they often need updating! Out of date plugins are a security risk to your site, so you need to stay on top of it.
Mistake #16: Ignoring Cyber Security
WordPress is one of the most popular CMS platforms across the world. That makes it a perfect target for hackers. It goes without saying that your WordPress site should be secure and free from malware. WordPress itself is pretty secure. However, plugins exist, allowing third parties to directly access and make changes to the database that powers your website.
A WordPress website has rows and rows of tables called MySQL Databases. These databases are vulnerable to malicious code being injected into them and attacking your site from the inside.
Sounds scary, right!?
A service called Wordfence will help keep your site secure – and it’s free! But, you should adopt your own security practices too:
- Use very strong passwords that you don’t use elsewhere
- Consider renaming the WordPress login page in your WordPress directory
- Don’t give admin access to people you don’t know or trust
- Keep your plugins and themes up-to-date
- Keep your site backed up
- Install and configure Wordfence Firewall to limit login attempts
- Use Two-Factor Authentication (2FA) to add an extra verification step to the login process
Don’t take the risk – secure your website. You wouldn’t leave your back door unlocked, ignoring your website’s security is like leaving the door wide open to attackers.
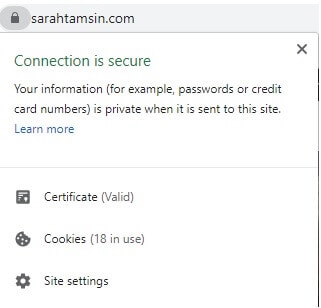
Mistake #17: Forgetting SSL Certificates
This is pretty much a pass/fail element of a good website these days. It used to be that only banks and e-commerce websites needed SSL certificates and small blogs didn’t matter, but those days are gone.
I’ll just be straight with you, your blog or businesses website should have had an SSL certificate ever since 2018. If it doesn’t, send your web host or agency a strongly worded email.
An SSL certificate means that your site is HTTPS:// and not HTTP:// – users will see the ‘Not Secure’ symbol in their browser for all HTTP:// sites. SSL Certificates are FREE using Let’s Encrypt. Your host should be able to provide this without charge, if it doesn’t – move hosts.
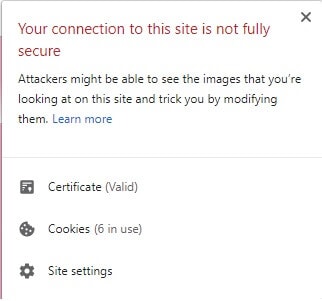
Mixed Content SSL Errors
Do you have an SSL certificate but your site is still showing as not secure? It could be because you have non-secure, third party content on your website. Check your plugins, scripts and theme files for the cause.
If you have a contact form, social media share buttons or blog comments, then your readers could potentially submit personal information via your website. This means you definitely need an SSL certificate to work towards GDPR compliance too. Yet, I still see so many digital businesses without an SSL certificate!
Google announced this years ago. Every single webmaster with a business or personal site is connected to Search Console was emailed about this.
Sites without SSL certificates won’t necessarily not rank in Google at all, but their rankings would be lowered and any similar sites with an SSL certificate will likely outrank them, if the content is high quality.
Those are some common mistakes made in WordPress. Many websites have these issues, but it doesn’t mean that you’re doing a bad job. Every day is a learning experience and I’ve personally made so many mistakes with my websites in the past. Don’t let these mistakes catch you up in the long run!