Is Divi bad for SEO? So many people ask this question, but there’s absolutely no way that a premium WordPress theme with tens of thousands of global users and a hefty price tag would be inherently bad for SEO, right?

Well, like everything else in this world, it’s not perfect. This blog post is about the various optimisations and customisations I’ve made to the Divi theme to make it slightly more friendly for search engines.
I’ve been using Divi by Elegant Themes for over 2 years, and it has definitely changed the way I work. It allows me to create beautifully designed sites in a lot less time than some other frameworks allow. I don’t use it for every site in my portfolio, but I’d say just over half of my current sites are Divi sites.
This site was using a Divi Child theme I made myself, but I recently switched to Gutenberg to learn more about using it as a framework instead of Divi. I was using a heavily customised Divi Child Theme, I added quite a few snippets to the theme functions file and a hell of a lot of CSS to make it look how I want.
For example, I removed the ‘projects’ custom post type and de-queued certain modules I knew I would never use, like the circle counter or the progress bars.
I generally use the Divi Builder for most of the structural work on a site, but almost everything else in my design workflow is CSS. I’m far more comfortable working that way, but many aren’t, and that’s the entire point of Divi.
When you commit yourself to a WordPress Framework with a page builder, you really are committing yourself. That’s because page builders like Divi (and all its competitors: Elementor, WP Bakery, Etc) all rely on WordPress shortcodes. When it’s time to change themes, you’ll spend a lot of time cleaning your new theme of old page builder shortcodes. So, you’re in it for the longhaul.
As a SEO Professional and content creator, I expect a WordPress theme to not put up any SEO barriers. Overall, Divi is a fantastic theme, framework and tool for creating incredible websites. There are just a few optimisations I make as standard to all my Divi sites, which are all for SEO benefits.
This article outlines the steps you can take to improve the SEO on your WordPress site using the Divi Theme. You will also learn exactly how to undertake these steps.
Contents
- 1. Change the <h1> tag in Divi’s Comments Template
- 3. Create a custom 404 page
- 4. Disable AJAX pagination on the Divi Blog Module
- 5. Add Breadcrumbs to Divi Pages
- 6. Ensure your Divi designs are truly responsive
- 7. Page Speed Improvements
- 8. Generate a Sitemap
- 9. Create Amazing Content
- Conclusion – SEO & Divi
1. Change the <h1> tag in Divi’s Comments Template
There is much debate amongst SEOs about the value of having multiple <h1> tags on your page. For SEO, <h1> tags are generally very important as they tell both the reader and search engines what a page is about. If there are more the one, or your headings are not descriptive, then it’s confusing for search engines.
No matter which school of thought you belong to on this one, the Divi Theme doesn’t give you much choice.
The comments section of every blog post has a <h1> tag, whether you want to use it or not. Fortunately, it’s quite straightforward to change!
Remember, that all heading tags are supposed to be structural, not decorative. So, <h3> is a sub-heading of <h2>, etc.
Here is how you can change this <h1> tag in the Divi Theme:
How to edit your blog post template using the Divi Theme Builder
Since Divi 4.0, you’ve been able to use the Divi builder on every single element of your website. Prior to this, you could only edit certain page templates using layouts or custom code (which is what I did for over a year before this pleasant surprise of an update!)
This means that you can create a single template using the Divi Builder and apply it to every single blog post.
In your WordPress dashboard, go to Divi > Theme Builder and then create a new template for use on all posts:
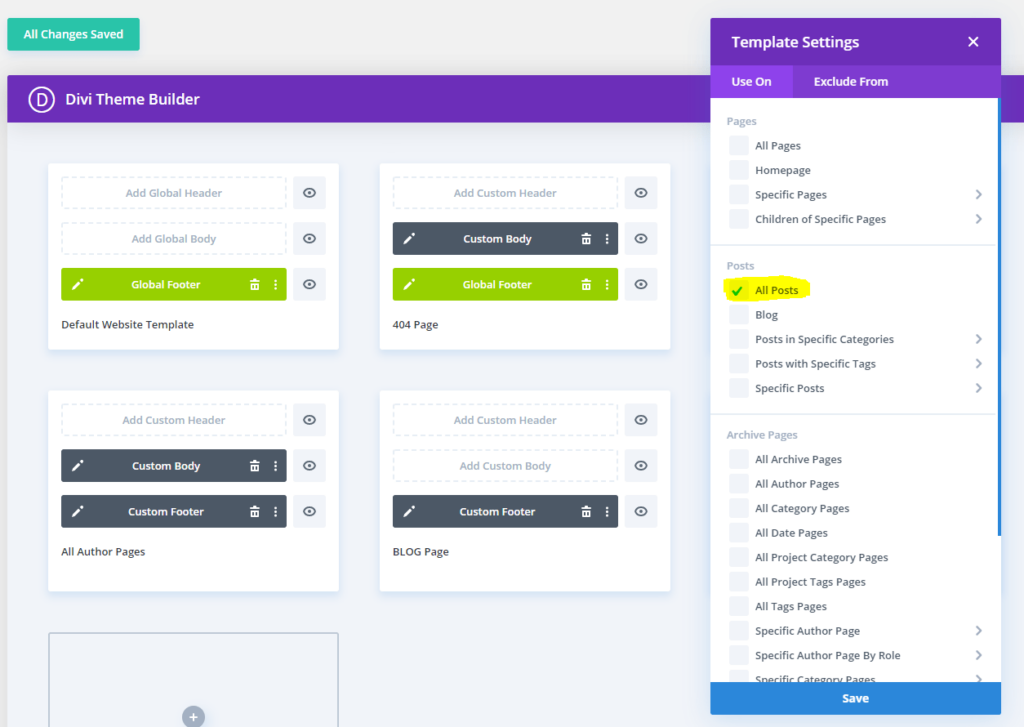
You don’t need to add a custom header or footer if you want to have it match the rest of your website.
Choose ‘Add Custom Body’ and build your page just like you would build any other page with Divi. Add the Post Content module to automatically populate that section with content from your blog post.
Add the Comments module below the Post Content:
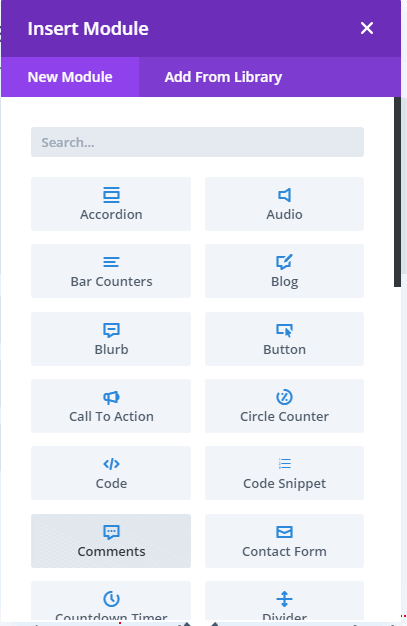
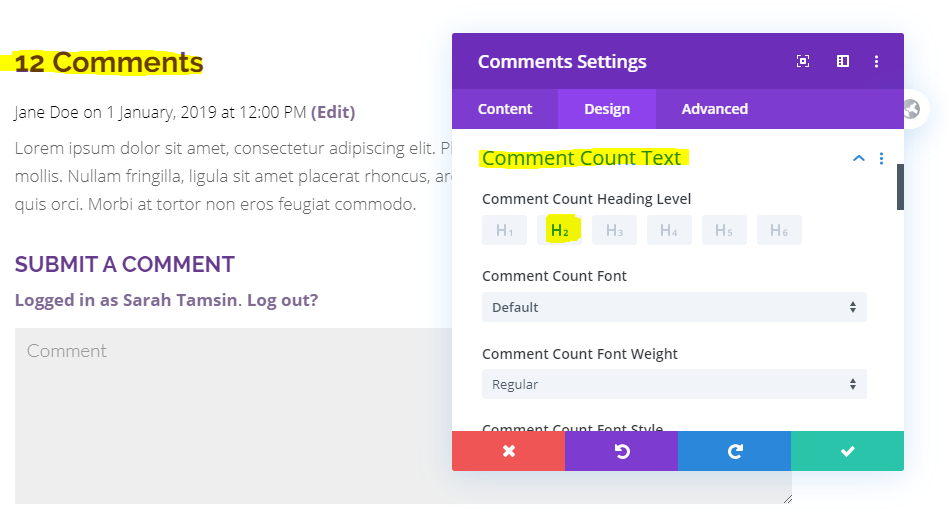
In the design tab, you can change the heading level. The element is called Comment Count Text. It’s set to <h1> by default, here you can easily change it to <h2>. Don’t forget to style the heading or add your own CSS so that it looks the way you want it to:
How to edit comments.php in a Divi Child Theme
If you’re not using the theme builder to edit your website, you can easily change the heading level of comments by editing the comments.php file.
It’s highly recommended that you only edit child themes, not parent themes. If you edit files in the parent theme, all your changes will be lost when your theme gets updated. By using a child theme, you avoid this happening and you can still customise exactly what you need to.
Copy the file called comments.php into your child theme’s folder using FTP or your host’s file manager.
Then open the file in your favourite code editor, or as this is such a simple change, you can do this really quickly in your WordPress Dashboard.
Go to Appearance > Theme Editor, then locate the comments.php file. If you have never accessed this section before, you will see a warning that you need to accept before continuing. Also, if you’re on a restricted ‘Managed WordPress’ hosting package (e.g. IONOS 1&1) then you will not be able to access these files without assistance from your host.
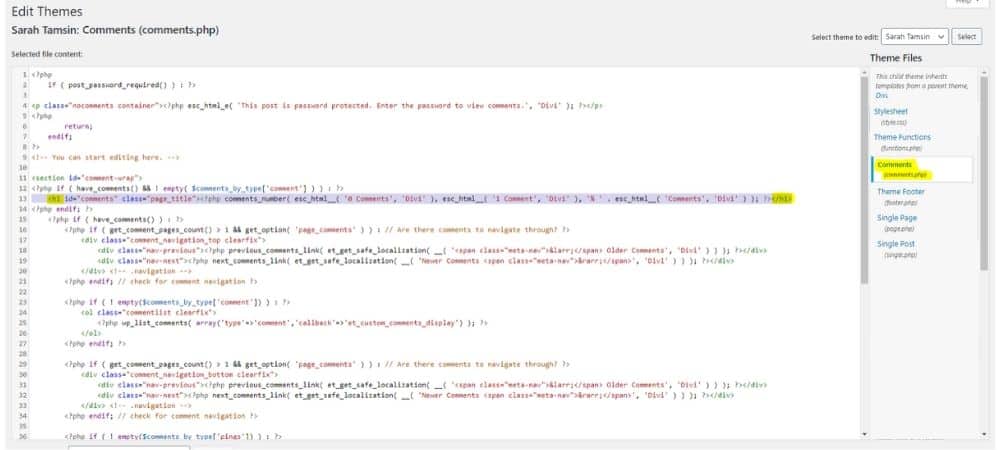
The only part you need to edit is highlighted below, it’s on line 13 and you simply need to change <h1 to <h2 (or <h3) and </h1> to </h2> and save.
Make sure you clear any cache and check that it’s working.
2. Check ALT text on images added using the Divi Builder
This is a quick and easy fix. Have you added any images to your site using the Divi Builder instead of the media gallery? If so, you may have accidentally overlooked the ALT text attribute – it’s easily done!
If you’ve recently audited your site and noticed a lot of missing alt text, it’s because it’s very easy to miss this step if you’re adding images directly into the Divi builder.
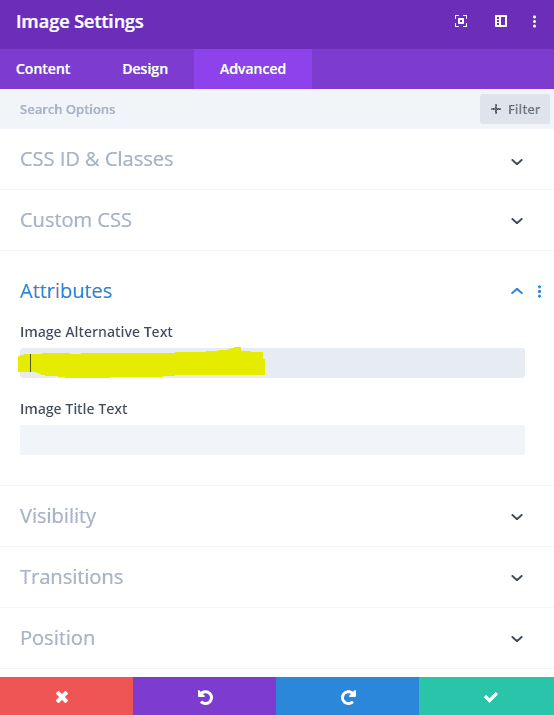
To check your image modules, access the Advanced tab of the module settings to populate your ALT text attribute:
3. Create a custom 404 page
This is not just specific to Divi, you should create a custom 404 page for your website no matter what theme or CMS you’re using. It’s even recommended by Google to do so.
Why? Because 404 is an error. It means that the URL someone is trying to visit does not exist and has not been told to redirect anywhere else. Obviously, you want to avoid 404 errors by maintaining your website and its links regularly. However, as sites grow, occasional 404s are inevitable, and that’s OK.
One of the worst things you can do is redirect all 404s straight to your home page without explanation. This is misleading for the user, they’re expecting to land somewhere but get redirected somewhere else instead with no explanation. If you must redirect them, make sure it’s to a similar or equivalent page.
It’s also confusing for Googlebot and other search engines trying to efficiently crawl your site to discover all its pages. Google has also confirmed that they do, in fact, crawl 404 pages.
By using a custom 404 page, you’re letting the visitor know that the content they’re looking is not there. It’s also giving you the opportunity to send them elsewhere on your site. Fortunately, Divi gives us a couple of different opportunities to build a custom 404 page.
Here are a couple of examples of 404 pages made using Divi:


Create a custom 404 page using the Divi Theme Builder
Using exactly the same method as creating a blog post template, you can also use the new Divi Theme builder to create a custom 404 page for your website or blog.
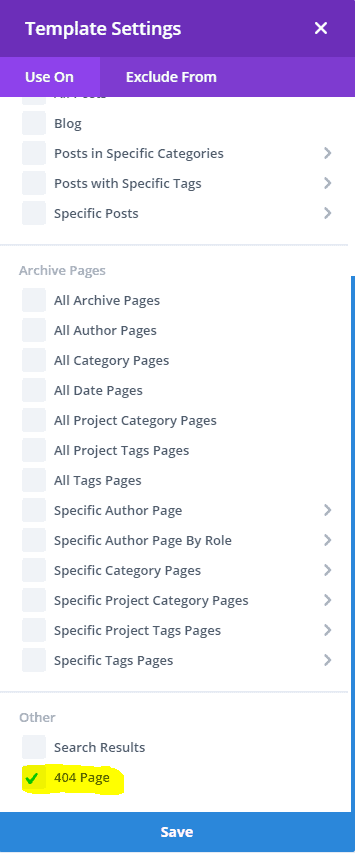
In your WordPress Dashboard, go to Divi > Theme Builder and create a new template for use on 404 pages:
Edit 404.php in a Divi Child Theme
Again, if you don’t use the Divi theme builder, you can edit the 404.php file that comes with the parent Divi theme by copying it into you child theme’s folder.
Using you code editor of choice, design your custom 404 page and upload it using FTP or your host’s file manager.
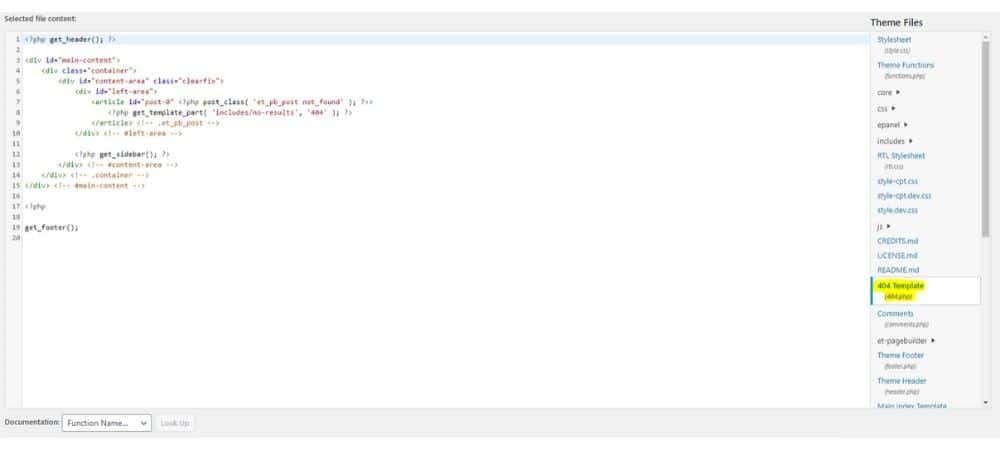
Alternatively, you can edit the page within WordPress. Go to Appearance > Theme Editor, then locate the 404.php file. If you’re new to this section of WordPress, you will see the same warning that I mentioned earlier. Also, if you’re on a restricted ‘Managed WordPress’ hosting package then you will not be able to access these files without your host.
4. Disable AJAX pagination on the Divi Blog Module
The Divi Blog module is a create way to customise how your blog posts are displayed on your site. Using the module gives you tonnes of visual customisation options as well as the ability to fine tune everything with CSS.
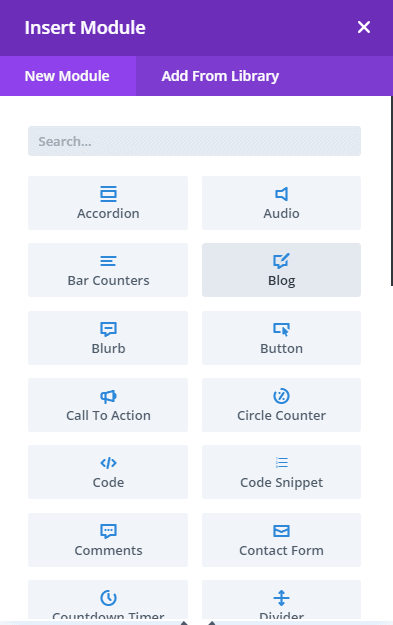
However, there is a major flaw in this when it comes to using Divi for SEO. The issue is the pagination element of the blog module.
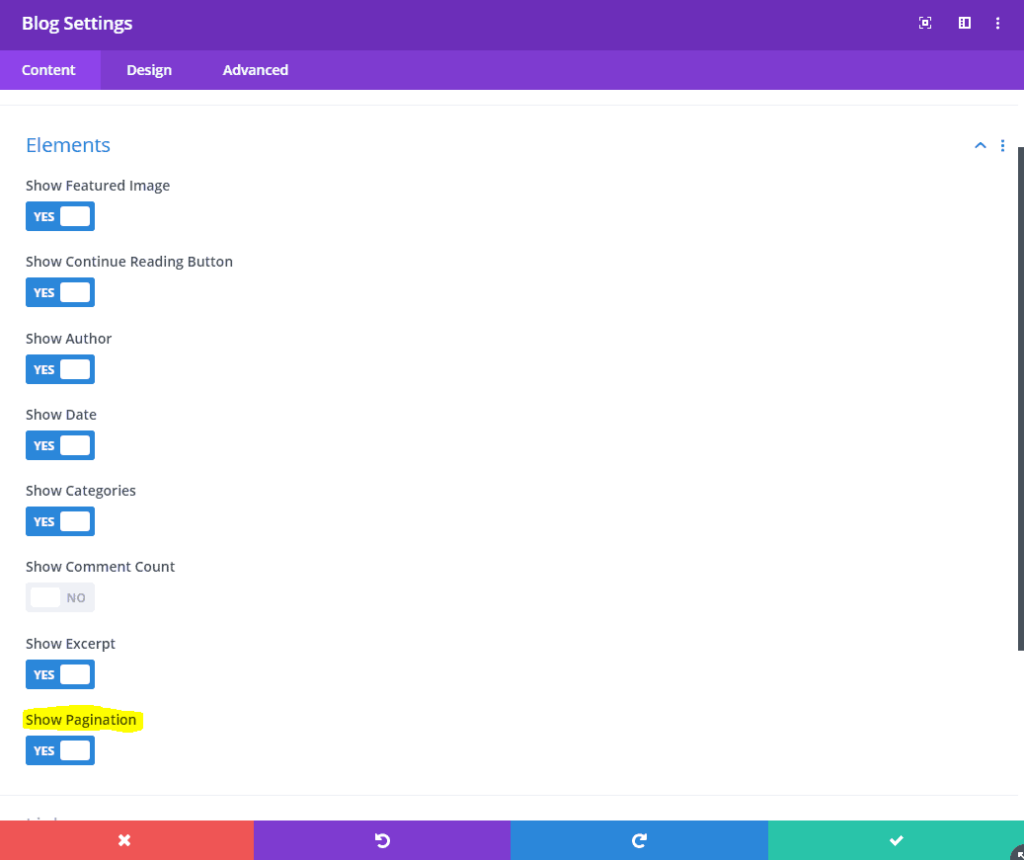
If you use this module with pagination (as pictured) then this does not use the standard WordPress pagination.
By default, WordPress creates paginated versions of your archive pages using the following URL structure:
- /blog/page/1/
- /blog/page/2/
- /blog/page/3/
- etc
However, the Divi pagination does not. It uses AJAX to generate the content dynamically within the browser, which is faster for the user, but more complicated for SEO.
Divi doesn’t create a paginated page structure for pages, instead it reloads the blog module when the user clicks on pagination links instead of the entire page.
While it is still possible to crawl pages behind ajax applications, it may be more straightforward for you to keep the standard WordPress pagination.
How to use Standard WordPress Pagination with the Divi Blog Module
Add a code module somewhere near the top of the page that you want to use a blog module with standard pagination:
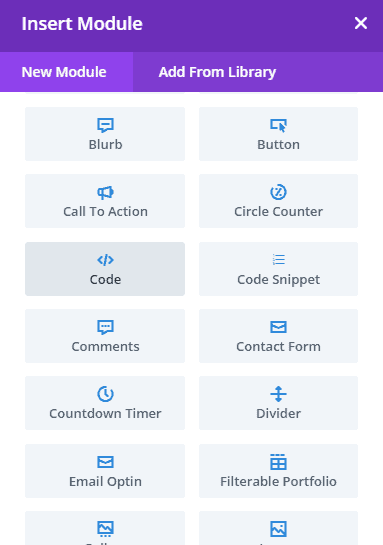
Add the following code to the code module:
<script>jQuery(function($)
{$('div.pagination a').on('click', function(e) {e.stopImmediatePropagation();});});
</script>
Thanks Reddit for this!
For a more global solution that affects all your blog, category, date, tag and author archives, you’ll want something less time consuming to implement. The above code needs to be on every single instance where you use the blog module and want non-ajax pagination.
In your WordPress Dashboard, navigate to Divi > Theme Options > Integration and paste the following code into the <head> section:
<script>
(function($) {
    $(document).ready(function() {

        $(".disable_ajax .pagination a").click(function() {
            window.location.href = $(this).attr('href');

            return false;
        });

    });
})(jQuery);
</script>
It should look like this:
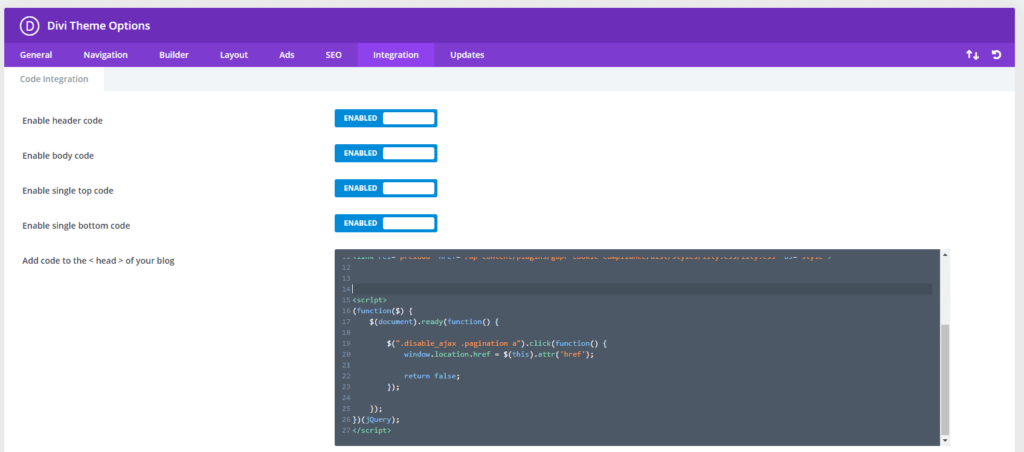
Wait – you’re not done yet! This code prevents Divi from doing its AJAX thing, but you need to define the CSS class in the blog module itself:
The class name is
disable_ajax
This can be accessed in the Advanced tab of the blog module settings:
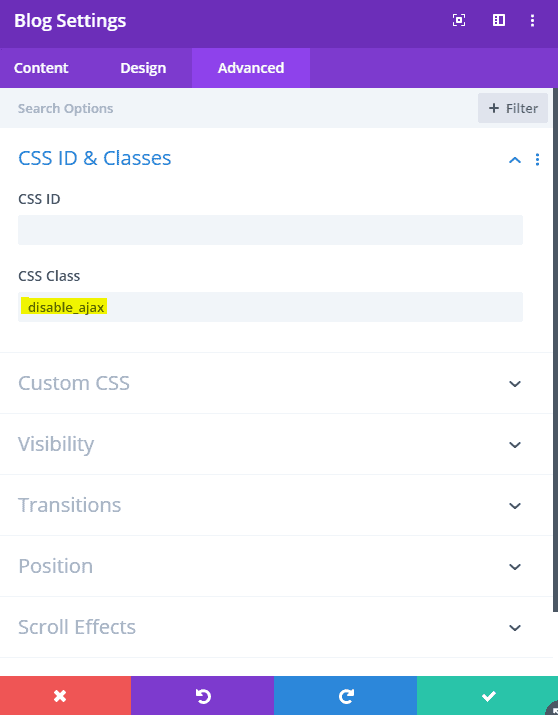
Make sure that all instances of the blog module with pagination have this same class, and you’re done! Phew!
Thanks to Elegant Themes for this!
Related: Solving Cloudflare 521 Problems with the Divi Builder
Breadcrumbs are excellent for both users and SEO. Their called breadcrumbs because it leaves a navigation trail for users, which helps a lot if your site has multiple levels of navigation, like this:

The Home, Blog and Digital are actually links for the user to navigate back through the various archive pages on this website. You can also see my breadcrumbs at the very top of this page, but they are not included in Divi by default. You have to add them in yourself.
Breadcrumbs are also great for SEO, as they help search engines crawl and index your content efficiently and accurately, as well as add schema which shows up in search engines too:

There are several ways to add breadcrumbs to Divi…
Using Yoast SEO Plugin
The popular Yoast SEO Plugin has the breadcrumb feature built in, but again, you have to enable it and manually add the breadcrumb code to the place in your theme where you want it.
In the case of Divi, this will the single.php file (for blog posts) or page.php (for standard pages) in your child theme. Here is the Yoast Breadcrumb code to add:
<?php
if ( function_exists('yoast_breadcrumb') ) {
  yoast_breadcrumb( '<p id="breadcrumbs">','</p>' );
}
?>
Here it is, in my child theme:
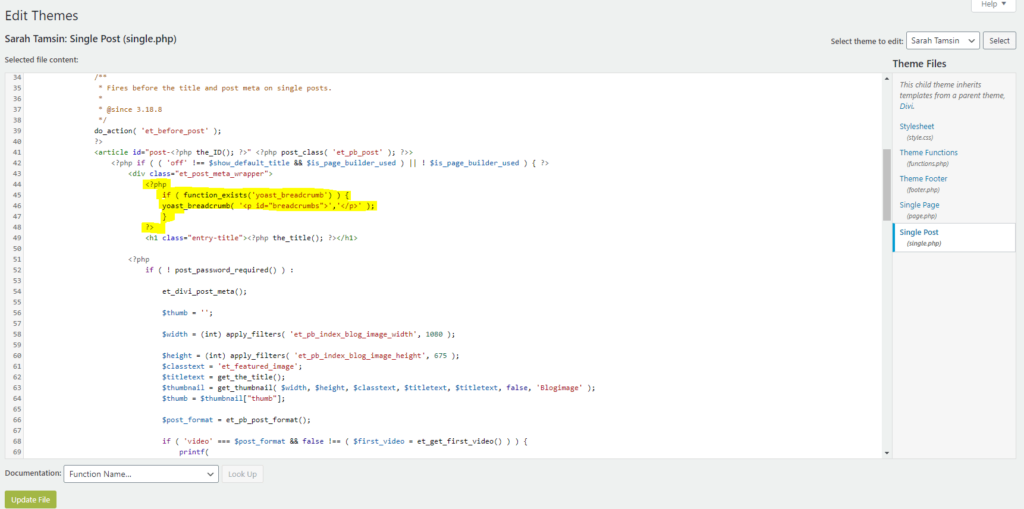
Alternatively, you can use Yoast’s shortcode in a Divi Theme Builder template:
[ wpseo_breadcrumb ] (without the spaces)
If you don’t use Yoast, there are several other ways to add breadcrumbs to Divi. Elegant Themes, who developed the Divi Theme and its suite of other WordPress tools have written a helpful blog post that covers this in a lot of detail. The first part of their post covers Yoast, but scroll down a little further to read about the other methods.
6. Ensure your Divi designs are truly responsive
When it comes to SEO, having a mobile-friendly page is one of the few pass/fail elements. In short, websites need to be mobile friendly. Google uses mobile-first crawlers, which means that it views your site as a mobile device, not a desktop computer.
The majority of pre-made Divi themes and layouts in the Divi library are mostly responsive, but I’ve found they display strangely on a mobile sometimes. It’s important to check.
Even if the theme is responsive, does it actually display properly on a mobile. That right-aligned module may look lovely on a desktop screen, but doesn’t look right on a mobile.
Even better, don’t use any of the built-in layouts in the Divi library and create something completely custom, using the mobile drag-and-drop builder, instead of the desktop one:
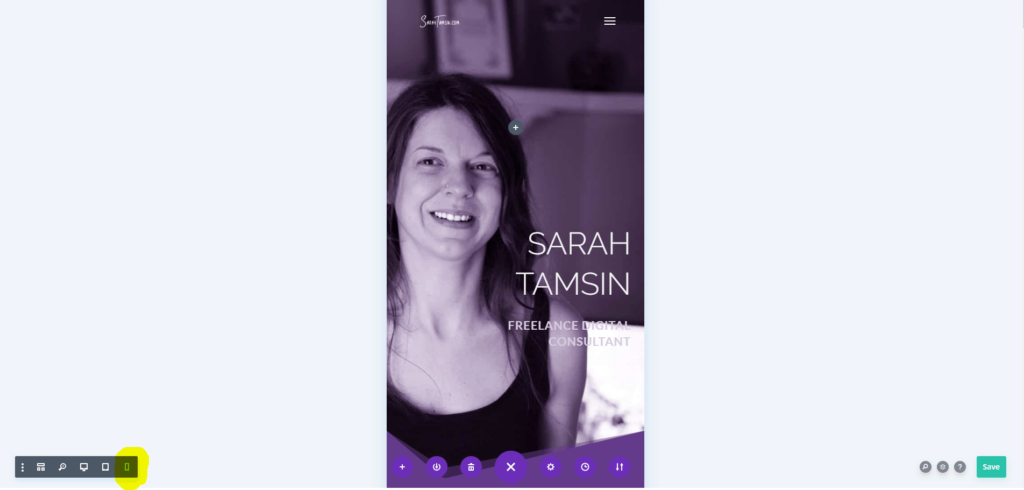
You can also style individual elements using media queries for different devices, and the Divi Builder makes this extremely easy to do. You can style elements differently for desktop, tablet, and mobiles:

However, you should only do this with styles and not with content. If you opt to display large amounts of different content across different devices on the same page, you could run into issues with duplicate content. This is because search engines and browsers will see the hidden content in the HTML, resulting in accidental duplication of content.
7. Page Speed Improvements
The biggest argument against using a tool like Divi is that “it’s such a drag on page speed” and it’s true. It can be. It’s also true for Elementor, WP Bakery (formerly Visual Composer) and all the other page builders on WordPress. It’s also true for the majority of plugins out there.
Every time you add a new element, there’s a new set of styles and scripts, resulting in more requests to the server and slower page load times.
This topic deserves an entire blog post in its own right (I’ve written one – it’s here!), and this doesn’t just apply to Divi either.
How to speed up the Divi theme
Divi in particular has a lot of code your site may not even need, but you can’t remove it entirely without completely breaking things. Fortunately, it’s quite straightforward to optimise a Divi site, especially if it was built with speed in mind in the first place!
Optimised Images
The biggest way to make your page load faster is to optimise images. Images are by far the biggest files that have to load on your site, the rest is text and scripts that either your browser, or the web server compiles into rendered HTML.
Every time that pre-rendered HTML runs into an <img> tag, it has to stop and wait for the image to download before continuing any further. You can prevent this with Lazy Loading and make the loading process faster by properly optimising your images before uploading them.
This means:
- Cropping the image to the required size, no larger than 1920px wide for a header image or 1000px for a blog image
- Saving as a Jpeg or PNG, with reduced quality (e.g. save for web with PhotoShop)
- Removing the EXIF Data
- Compressing the image using a compression algorithm such as lossless on a site like tinyjpg.com
- Using an optimisation plugin such as Smush, EWWW or ShortPixel (I recommend ShortPixel for an all-in-one image optimisation solution)
- Consider serving .webp images instead of jpegs (edit your .htaccess file)
Enable Static File Generation in Divi’s Theme Options
In the WordPress Dashboard, go to Divi > Theme Options > Builder > Advanced and you’ll see an option called Static CSS File Generation. Make sure this is enabled. You can also clear the static CSS file cache here too.
Third Party Caching + Optimisation Plugin
Use one of the many extremely popular WordPress Caching and Optimisation plugins available. It’s important to learn the difference between caching and optimisation before you blindly start ticking all the options in these plugins:
- W3 total cache (Caching)
- Autoptimize (Optimisation)
- WP Rocket (Caching & Optimisation)
- LiteSpeed Cache (Caching & Optimisation)
Go easy on the animations and scroll effects
Just because they have the options to add animations or scroll effects to everything in Divi, it doesn’t mean that you should. Just like in PowerPoint, you can make everything flash and fly around, but you’ll give your audience a headache.
These animations and scroll effects definitely have their place in modern website design, but use them sparingly to make certain elements stand out. Don’t use them everywhere.
8. Generate a Sitemap
WordPress, nor the Divi Theme will generate an XML Sitemap automatically, so ensure you have XML Sitemaps enabled in Yoast (or other SEO Plugin) or find a dedicated plugin to create a sitemap.
There’s also the option of creating a beautiful HTML sitemap for users too.
9. Create Amazing Content
Well, this is a given, right?!
No matter what theme you’re using, whether it’s a premium theme with all the bells and whistles like Divi, or a stripped back basic theme like Type or the default Twenty TwentyOne, you need great content for it to perform well in search engines.
There’s no point have a beautiful, premium website if it doesn’t get any visitors. It’s always going to be the content, not the design of a website that draws customers in.
Conclusion – SEO & Divi
In general, these are relatively minor tweaks to make to a theme and Content Management System that’s already pretty damn good at SEO. WordPress at its core doesn’t even do Meta Descriptions, Sitemaps, Canonicalisation, Schema, or many other SEO features you’d expect. Almost all of these have to be added using Custom Fields or a third-party plugin, such as Yoast or RankMath.
No theme is perfect for SEO, and there are a lot of common features with the Divi theme that you’ll see all around the internet. People will create custom home page layouts, but they won’t bother styling the comment form, the add to cart button, or the search bar. It’s those small things that will really make your Divi site stand out over the thousands of others.
In April 2021, RankMath SEO (another popular WordPress SEO plugin) became fully compatible with Divi, meaning you can use the SEO options within the visual builder. I haven’t used this functionality with RankMath and Divi so I can’t comment, but if you have, leave a comment below with your observations.
Summary: Divi SEO Tips to make Divi more SEO-Friendly
- Change the <h1> heading tags in Divi’s comments template
- Check the ALT text on images added using the Divi Builder
- Create a custom 404 page for your website
- Disable AJAX pagination on the Divi Blog Module
- Add Breadcrumbs to Divi Pages
- Ensure your Divi designs are truly responsive
- Make suggested page speed improvements across your site
- Generate a sitemap
- Create amazing content!
Above all else, you need great content to rank well, and strong technical SEO knowledge in combination with a robust WordPress framework (such as Divi) gives you an excellent foundation to build upon.


