When talking about WordPress – there’s always someone in the room who will bring up the important, but often overlooked issue of WordPress security.

This article will cover 9 ways to harden WordPress and improve the security of your WordPress website.
If you’ve ended up here, you don’t need a lecture about why WordPress can be insecure, as you probably already know that.
There are, however, many steps you can take as a website owner to address common security issues.
Contents
- 1. Block External Access to Dotfiles 🛑
- 2. Ensure File & Directory Permissions are Set Correctly 🗂️
- 3. Use a Web Application Firewall (WAF) 🧱
- 4. Ensure the Server has Fail2Ban & ModSecurity Configured Correctly ✋
- 5. Remove File Editing Permissions from the Dashboard ⛔️📄
- 6. Enforce Multi-Factor Authentication 🔐
- 7. Disable Directory Browsing 🗂️
- 8. Block or Disable XML-RPC ⛓️💥
- 9. Set Security Headers 👮♂️
This article assumes you have the technical knowledge to edit files on your web server using sFTP or SSH and that you’re comfortable in doing so.
Do not add or execute any code from within this article unless you know what you are doing, have taken a backup of important files and data and know how to revert any changes you’ve made.
1. Block External Access to Dotfiles 🛑
Dotfiles (such as .htaccess) are incredibly important as they contain security directives and other important information for the web server.
Read that again – for the web server.
No other machine (except for the aforementioned web server) needs to access these files.
So, why are they available to the public? 🤔
Let’s block them, shall we?
Add the following code block to your .htaccess file:
# Block Access to dotfiles
<FilesMatch "^\.">
Order allow,deny
Deny from all
</FilesMatch>
This will deny access to anyone (except the web server) from accessing or reading the contents of these files.
If anyone does try to access them, they will get a 403 (forbidden) error code instead.
If you’re a web developer using libraries or packages (for example, a /vendor/ folder) then you can also block these (and their associated composer.json and composer.lock) files too.
These files reveal which PHP packages are in use, and if there are any public vulnerabilities then it’s a bit like leaving your backdoor unlocked!
To block access to composer.json and composer.lock, use the following code in your site’s .htaccess file:
# Block Access to Composer files
<FilesMatch "^(composer\.lock|composer\.json)$">
    Order allow,deny
    Deny from all
</FilesMatch>

# Protect vendor directory
RewriteEngine On
RewriteRule ^vendor/.*$ - [F,L]
This protects the integrity of your website’s installation, especially if you’ve done any custom development work.
Without taking these step, these libraries would be visible to the public which could reveal essential security information about your build process and technology stack, allowing a malicious actor to take advantage.
2. Ensure File & Directory Permissions are Set Correctly 🗂️
Every file and folder on your web server has specific permissions that are applied recursively.
These are usually represented as numbers, where each digit can either be the sum of 0, 1,2 or 4.
This is not just a WordPress thing – this is applicable to all web servers and many other computer systems too.
They’re also sometimes expressed as letters: r, w, x, and -.
- First digit: Permissions for the file owner (usually the web server or FTP user)
- Second digit: Permissions for the group that the file belongs to
- Third digit: Permissions for everyone else in the world
This will look like, for example:
644 (rw-r--r--)– The owner can read/write, everyone else can read only755 (rwxr-xr-x)– The owner can read/write/execute, everyone else can read/execute777 (rwxrwxrwx)– The owner and everyone else can read/write/execute600 (rw-------)– The owner can read/write and no one else has any permissions
What Should WordPress File & Folder Permissions be?
For a WordPress site:
- Folders/directories: and
755 (rwxr-xr-x) - Files:
644 (rw-r--r--)
Special Permissions for wp-config.php
The wp-config.php file is different, and requires additional layers of protection as its contents is more sensitive.
For wp-config.php, the recommended permission setting is 400 or 440 to ensure maximum security. This allows read access only to the user and, with 440, the group as well – but no one else.
How to Check & Change File Permissions
You can right-click on any file or directory in FTP to view the permissions.
However, to do this in a WordPress site that contains tens of thousands of files will take you years!
So, instead, you can use the terminal on your web server to change all directory permissions to 755:
find . -type d -exec chmod 755 {} \;Then change all files to 644:
find . -type f -exec chmod 644 {} \;Then finally, change the config file (change this to 400 or 440 according to your needs)
chmod 440 wp-config.php3. Use a Web Application Firewall (WAF) 🧱
WordPress is a web application hosted on a web server, and it needs a firewall, just like all other web applications do.
What does a firewall do? 🤔
- Block Brute Force Attacks: WAFs can identify and block brute force attempts aimed at guessing your WP admin login credentials.
- Mitigate DDoS Attacks: Distributed Denial of Service (DDoS) attacks aim to overwhelm your website with traffic, making it inaccessible. WAFs can help absorb and mitigate these attacks, keeping your site online for regular visitors.
- Prevent SQL Injection and XSS: WAFs are designed to detect and block attempts at exploiting SQL injection vulnerabilities and Cross-Site Scripting (XSS) attacks, which can lead to data theft, website defacement, or the distribution of malware to users.
- Zero-Day Exploits Protection: WAFs can provide a layer of defense against zero-day exploits (vulnerabilities that are not yet known or patched).
- Customizable Security Rules: Most WAFs offer the ability to customize security rules to address the specific needs and threats facing your website.
- Compliance and Data Protection: For businesses that handle sensitive information, a WAF helps in complying with data protection regulations by safeguarding against potential accidental or malicious data breaches and leaks.
- Reduced Server Load: By filtering and blocking malicious traffic before it reaches your server, a WAF can reduce the load on your WordPress hosting server, ensuring better availability for legitimate users.
There are several options available when looking for a Web Application Firewall to protect your WordPress site:
- CloudFlare (Free and paid versions available)
- WordFence (Free and paid versions available)
- Sucuri (Paid only)
- MalCare (Paid only)
- JetPack (Paid only)
Use your Firewall to block access to /wp-admin
You can restrict access to /wp-admin/ (and /wp-login/ too unless your site has customer login functionality) so that only pre-approved IP addresses can access it.
I personally do this using Cloudflare, and I’ve written a full tutorial on it already – read it here.
4. Ensure the Server has Fail2Ban & ModSecurity Configured Correctly ✋
This is often something this is up to your hosting company, but if you manage your own web server then this is relevant to you too.
All web servers running PHP applications like WordPress need to have:
- Fail2Ban – an intrusion prevention software framework that protects your server from brute-force attacks by monitoring server logs for suspicious activity, then creates dynamic blocking rules accordingly
- ModSecurity – helps in identifying and blocking real-time threats to your WordPress site.
How to Configure Fail2Ban
This should be set up automatically by your hosting company, but if it’s not…
- On a Linux server, you can usually install Fail2Ban via the package manager, for example,
sudo apt-get install fail2ban. - Configuration: Edit the configuration files located in
/etc/fail2ban. You’ll mainly use the file calledjail.localfor your custom settings. Here, you can define which services to monitor, set ban times, and specify the action to take when a ban takes place.
How to Configure ModSecurity
This should be set up automatically by your hosting company, but if it’s not…
If you’re using a system like cPanel, then all you really need to do is make sure ModSecurity is ‘enabled’ like in the Diagram below 👇


ModSecurity can be easily installed as a module in Apache, Nginx, or IIS. The installation process really does vary depending on the server.
After installation, enable the OWASP Core Rule Set (CRS) or other relevant security rule sets that suit your environment.
For WordPress, you will need to add your own custom rules that specifically address common vulnerabilities within WordPress or the plugins you’re using.
5. Remove File Editing Permissions from the Dashboard ⛔️📄
Your WordPress dashboard contains a file editor that is accessible to administrators (and possibly user user roles via a third-party plugin).
You can usually access it via:
- Appearance > Theme File Editor
- Plugins > Plugin File Editor
However, access either of these screens will give you a warning if it’s the first time you’ve ever visited them.
You should not be changing any content here – it’s incredibly risky.
Third party plugins also add the ability to edit certain files – SEO Plugins such as Yoast and RankMath let you edit the robots.txt file and, for some reason, the .htaccess file (which is incredibly risky, as one typo in this file could bring down an entire site!)
It’s dangerous to allow website administrators file editing permissions from within the dashboard itself.
If the website was ever breached, it would be a disaster if a malicious actor was allowed to edit files on your web server.
Also – it’s easy for experienced web developers to make a mistake while editing these files and inadvertently cause a site to go down without being able to access it again to put things right!
Luckily, there’s an easy way to disable the file editing ability within WordPress!
Simply add the following line (known as a constant) to your WordPress wp-config.php file and that’s all set.
define( 'DISALLOW_FILE_EDIT', true );This will also block the ability of many third-party plugins from allowing you to edit files from the WordPress dashboard.
6. Enforce Multi-Factor Authentication 🔐
Multi-Factor Authentication (MFA) adds an extra security layer, making it much harder for attackers to gain unauthorised access to your website, even if they have compromised login credentials.
It can also protect against phishing where legitimate users are tricked into entering their details into a malicious website.
There are several reliable MFA plugins available for WordPress.
Some popular options 👇
- Wordfence Security: Offers login security features, including 2FA, and is known for its firewall and malware scanner.
- Google Authenticator: Provides a simple way to use Google’s Authenticator app for MFA.
- Two-Factor: A lightweight plugin for enabling various second-factor methods, including email and TOTP.
7. Disable Directory Browsing 🗂️
Your website has directories and files stored on a web server. They’re organised into files and folders just like the ‘Documents’ folder on your own personal computer.
In theory, it’s possible for anyone with access to the internet to view your website’s files via their web browser.
But, in practice, WordPress has some best practice guidelines for plugin and theme developers to avoid this.
A simple step that developers can take is by adding an index.php file to every directory.
Within that file, include an opening PHP tag, a comment, and nothing else.
For example:
<?php
// Nothing to see here.
Another example:
<?php
// Silence is golden
But, what does this do?
The name of the file matters: index.php (or index.html) is a standard file that usually denotes the ‘home’ page – e.g. it will lead you to the index of files contained within.
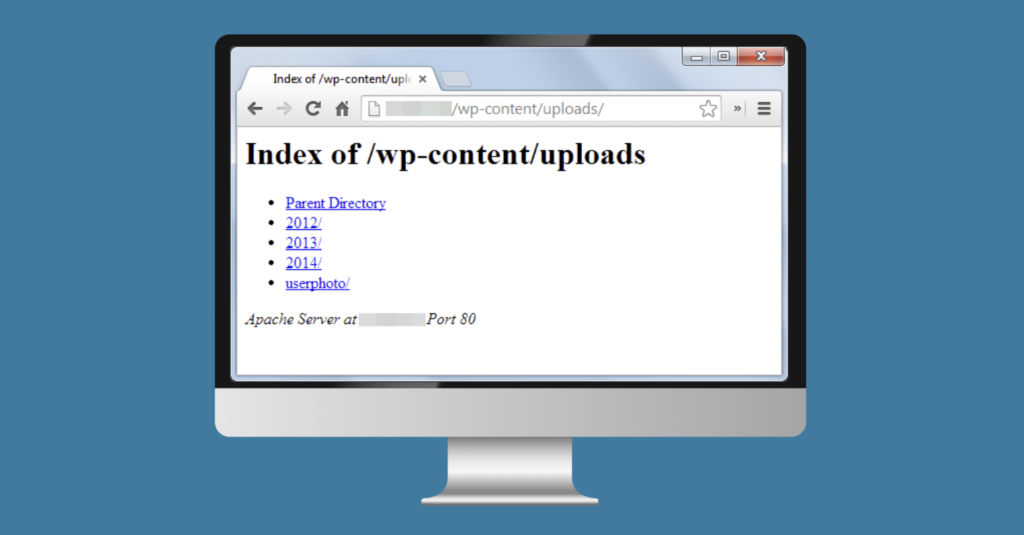
If there is no file for index.php – the web server will load a list of files and directories, such as:

So, what’s the problem with this?
The public should not be allowed to randomly browse your directories in this manner! They may access confidential information in plain text, such as the wp-config.php file or other files containing secure information.
Block Directory Browsing Using .htaccess
You can also outright block all directory browsing using the .htaccess file:
# Disable directory browsing
Options All -Indexes
This means that if a user navigates to a directory without a default index file (like index.php or index.html), the server will not display a list of the directory’s files and subdirectories, enhancing the website’s security by preventing users from viewing potentially sensitive files or directory structures.
Instead, anyone trying to nose through your website’s directories and files will see a 403 error.
Much better.
8. Block or Disable XML-RPC ⛓️💥
XML-RPC is a remote procedure call (RPC) protocol which uses XML to encode its calls and HTTP as a transport mechanism.
With WordPress, XML-RPC facilitates the connection with web and mobile apps, allowing remote content publishing to your WordPress site.
The popular ‘WordPress’ mobile app (and the JetPack Plugin) uses XML-RPC, so users of this app should not disable it, or the app will no longer function.
However, this feature is insecure and not necessary.
It’s almost like it’s a legacy feature at this point.
Most website owners do not need XML-RPC on their WordPress websites. Leaving it enabled is a security risk.
The WordPress REST API is much more secure and robust way to remotely manage content.
But, XML-RPC is enabled by default on all new WordPress installations.
Here is how to disable it 👇
How to Disable XML-RPC
Add the following code block to your .htaccess file to block all requests to xmlrcp.php:
# Block WordPress xmlrpc.php requests
<Files xmlrpc.php>
order deny,allow
deny from all
allow from 123.123.123.123
</Files>
You can also add this line to your wp-config.php file, but this will only block its functionality, not requests like the .htaccess method:
add_filter('xmlrpc_enabled', '__return_false');
9. Set Security Headers 👮♂️
Setting security headers is a critical step in strengthening the security of your WordPress website.
These HTTP response headers tell browsers how to behave when handling your site’s content, providing an additional layer of protection against common web security vulnerabilities.
This is applicable to all websites – not just WordPress!
Content Security Policy (CSP)
Purpose: Restricts resources (such as JavaScript, CSS, or images) the browser is allowed to load. A properly configured CSP can reduce the risk of XSS attacks.
Example Configuration 👇
Content-Security-Policy: default-src 'self'; script-src 'self' https://trusted-site.com;X-Content-Type-Options
Purpose: Prevents browsers from MIME-sniffing a response away from the declared content-type. This header stops the browser from trying to guess the MIME type, which can help prevent some types of attacks.
Example Configuration 👇
X-Content-Type-Options: nosniff # completely prevents all MIME-sniffingX-Frame-Options
Purpose: Protects your site from clickjacking attacks by preventing your content from being embedded into other sites using <iframe> or other forms of embedded content.
This does not affect your ability for your website’s Open Graph (OG) images from being displayed, as they are accessed by crawlers, not frames.
Example Configuration 👇
X-Frame-Options: SAMEORIGIN# only allows frames from the same domain nameStrict-Transport-Security (HSTS)
Purpose: Ensures browsers always use a secure (HTTPS) connection when visiting your site, preventing SSL stripping attacks.
Example Configuration 👇
Strict-Transport-Security: max-age=31536000; includeSubDomains# forces https on all subdomains for 1 year X-XSS-Protection
This header is now deprecated as modern browsers have built-in XSS protection mechanisms.
Purpose: However, it was/is used to enable the browser’s XSS filtering and block pages with detected XSS attacks.
Example Configuration 👇
X-XSS-Protection: 1; mode=blockReferrer-Policy
Purpose: Controls how much referrer information should be included with requests.
Example Configuration 👇
Referrer-Policy: no-referrer-when-downgrade# full URL when the same protocol and only the domain for HTTPS to HTTP).Feature-Policy (aka Permissions-Policy)
Purpose: Allows you to explicitly declare which features and APIs can be used in the browser.
Example Configuration 👇
Feature-Policy: geolocation 'self'; midi 'none';# restricts geolocation to the same origin and disables MIDIHow to Implement Security Headers in WordPress
- Via
.htaccess(Apache): You can add the above headers directly to your.htaccessfile if your server runs Apache. - Via
nginx.conf(nginx): For nginx servers, add the headers to your server block. - Via CloudFlare: It’s also possible to send http headers via CloudFlare.


