If you’re a blogger or your business’s website runs on WordPress, you’ll probably know that it’s super important for your website and its content to load fast. Nobody likes a slow website, right?

Sure, your site might load lightning fast in your house where you have fast Broadband, but your customers could be using slower connections and they simply get fed up with waiting for your page to load.
If your competitor’s website loads faster than yours, then Google is going to notice too.
Website speed is an important factor in how your website performs on search engines. Slow websites are likely to lose visitors if the pages takes too long to load, this on its own is bad enough, but it also sends Google a signal that people are ‘bouncing’ when waiting for your page to load.
I recently built this website (sarahtamsin.com) with speed in mind. It’s not absolutely perfect yet and I know I’ve still got improvements to make. However, my homepage currently has a 98% Page Speed score and I’m very proud of that!
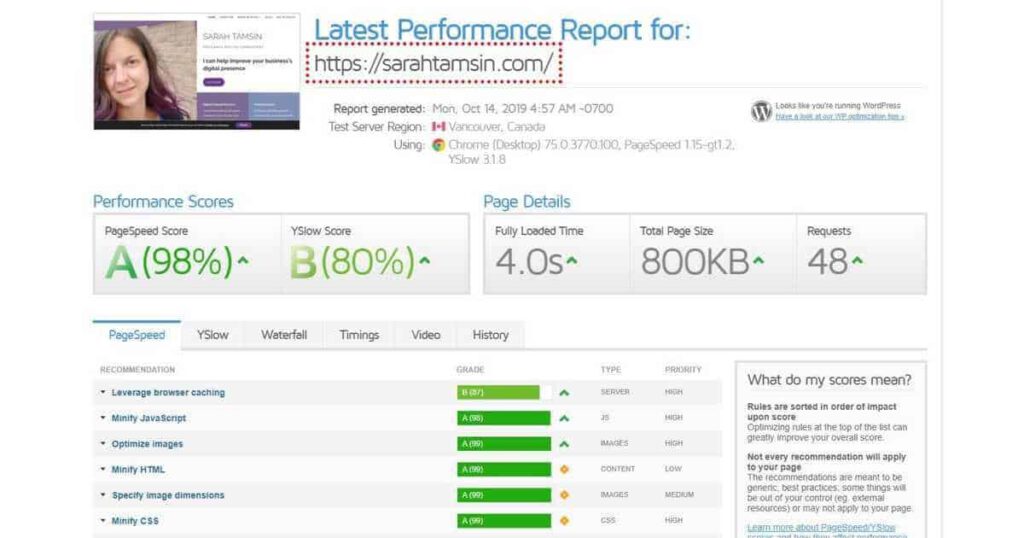
In this post, I’m going to share with you exactly why and how I was able to build a site using extremely cheap hosting and have it gain a 98% score. This article is all about improving the speed of your WordPress website with practical tips that you can put into action straight away to see a noticeable difference in your page’s load time!
You will learn…
- Why Page Speed matters so much
- How to measure your current page speed and identify how to improve
- Which plugins are useful and which to avoid
- How to reduce render blocking and defer JavaScript
- All about caching
- More WordPress speed tips to help your website

Contents
- Why is Page Speed so Important?
- How to measure your current Page Speed
- How to make your WordPress Website Faster – WordPress Speed Tips for Lightning Fast Websites
- 1. Reduce the number of overall Plugins
- 2. Selectively load scripts & styles
- 3. Optimise and compress every image
- 4. Lazy loading images
- 5. Use a Content Delivery Network (CDN)
- 6. Leverage Browser Caching (Add Expires Headers)
- 7. Optimising your code (minify and more)
- 8. Defer JavaScript & Stop render blocking
- 9. Avoid Redirect Chains
- 10. Don’t show social share counts
- 11. Turn off comment avatars (or commenting all together)
- 12. Get better hosting!
- In Conclusion
Why is Page Speed so Important?
Your page speed is important because it impacts visitor behaviour, which in turn affects your conversions and your revenue. Think about your own experience online and how frustrating it is when you’re trying to use a slow loading website. You’re far more likely to give up and go elsewhere instead of waiting ages for a page to load.
Page speed is important for all websites, even small blogs. But if you’re running an ecommerce business, membership website or software as a service (Saas) then it’s even more important that your retain visitors.
For ecommerce sites, a slow experience could mean that more customers abandon their purchases entirely. With membership websites, you could have low customer retention and lots of abandoned accounts. When it comes to blogs, readers will just give up all together and read the information on someone else’s much faster blog.
Even a second or two makes a huge difference in visitor behaviour. Remember – not everyone has the luxury of high speed internet!
Having a fast website has so so so many benefits, to name just a few:
- Better user experience
- Happy customers
- Increased conversion rate
- Lower bounce rate
- Improved online reputation
- SEO benefits
Google has even put together an entire resource on why your website’s performance and speed matters so much. They cite a case study where a large ecommerce site increased its page speed by just 1 second and as a result generated over $700,000 more income that month than the previous month. That is insane. Unbounce have also written about page speed, even 100 miliseconds makes a difference to conversion rates.
Spending time improving the page speed of your WordPress site will only do positive things for your business. Even bloggers and small niche site owners will see the benefits from investing in page speed improvements.
How to measure your current Page Speed
Before you start making speed optimisations and improvements, you need to know what exactly is slowing your website down. Otherwise, you could be wasting your time making optimisations that don’t need to be made. As business owners, it’s important to spend your time wisely!
There are loads of different tools available online to do this, here are a few of the best:
GTMetrix
GTMetrix.com lets your quickly analyse any website URL and gives you an in-depth performance report, highlighting areas for improvement.
It’s completely free to use. Visit GTMetrix.com to find out how your website performs.
Google Page Speed Insights
Page Speed Insights uses Google Lighthouse when measuring the performance of a website. Google Lighthouse can also provide you with more insights such as accessibility, but Page Speed Insights is all about performance.
When you analyse your URL using this tool, you’ll notice it gives you 2 different scores; one for desktop and one for mobile. You’ll also see suggestions and recommendations for improvement. Pay special attention to the mobile score once your site has been switched to mobile-first indexing by Google.
Again, this is free to use so visit Google Page Speed Insights to find out your page speed score.
Lighthouse (Google Chrome Browser)
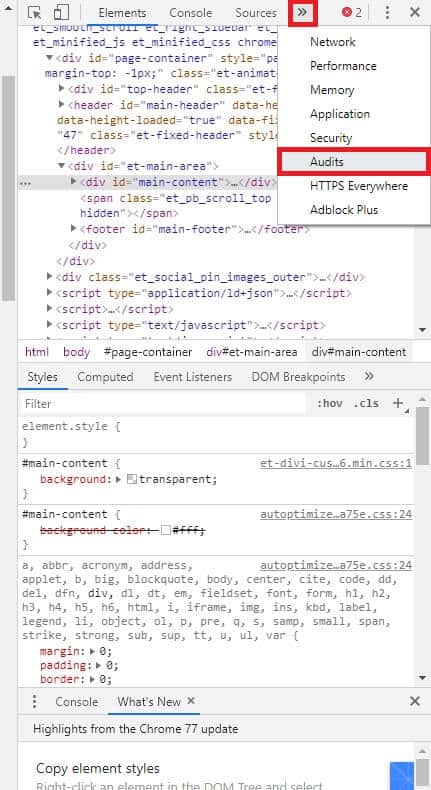
The ability to perform a speed audit on any website is built into the Google Chrome browser.
Visit the website you want to test, then press Ctrl+Shift+I or right-click and choose ‘Inspect’ to open the Developer Tools on the right of the Chrome window.
Choose ‘Audits’ in the menu as shown below:
Then, select your chosen options and click ‘Run Audits‘
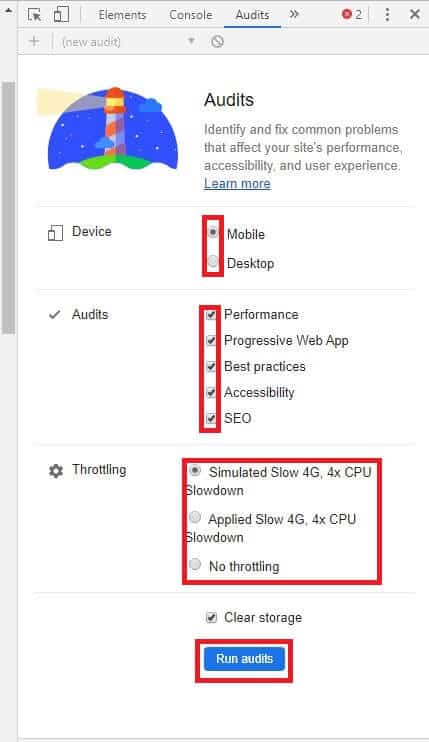
It will take a couple of minutes for your results to appear.
How to make your WordPress Website Faster – WordPress Speed Tips for Lightning Fast Websites
If you have any form of caching already enabled on your site, clear the cache completely after implementing new speed improvements. You must clear your cache and wait a few minutes before re-testing your page speed score or you may not see a difference.
So, here are the speed optimisation that I currently use on my websites:

1. Reduce the number of overall Plugins
Need a new function on your website? There’s a plugin for that! Consider what functionality you genuinely need on your website. Do you really need that exit intent popup box? Is it essential that every blog post shows its Social Media share counts?
Every single plugin that adds a new feature to your website also increases its load time. Some plugins are extremely lightweight and are nothing more than a few lines of code. Others can have a huge impact on your page load time.
That doesn’t mean to say that you can’t use plugins at all, only use the ones that you actually need in order to run your business.
How to remove necessary plugins
- In your WordPress Dashboard, go to Plugins > Installed Plugins
- For each plugin on that list, ask yourself if they’re absolutely essential for your website
- Discover whether you can achieve the same function without needing a plugin
- Before you uninstall any plugins, take a backup of your site saving any data from the plugin that you might want to keep
2. Selectively load scripts & styles
This is a real bonus that I only started implementing a few months ago. Selectively loading scripts and styles is now part of my standard build for WordPress sites.
You probably have a contact form plugin for your website’s contact page. It’s most likely only used on that page. But, the script and style sheet for it is loaded when someone visits every single page.
Most websites have multiple stylesheets and scripts, you should ensure that only essential scripts and styles are pre-loaded, so the above-the-fold content and styles load before the rest. Prioritising the above-the-fold content dramatically improves the ‘time to meaningful paint‘ speed with Google Lighthouse.
The same goes for many other plugins and theme features, they’re only used on certain pages. So, you can disable them on the pages that you don’t need them.
How to unload scripts at page or post level
WP Asset Manager Plugin will achieve this, plus it has other features to help you speed up your site.
- Download the WP Asset Cleanup Plugin and activate it
- Enable ‘test mode’ in the plugin’s settings (this means that any changes you make won’t affect your live site)
- Tweak the options, unloading different scripts for the entire site or per page/per post
- Test your site, ensuring everything works properly
- Disable test mode and clear the cache
- Enjoy your new lightning fast website!
3. Optimise and compress every image
Images probably account for the largest resource on your website, so optimising them can do a world of good for your page speed. A compressed image can shave entire seconds off your page’s load time. You do not need 4000px wide, 6MB images on your blog. At most, images should be 800px wide if it’s for the body of a blog post. Full-width images can be 1920px.
But, there’s more to it than cropping your images to the right size (that’s still a good place to start).
JPEGs and PNGs also have extra data within the file that’s just not needed. A JPEG contains information about where the photo was taken and what the camera’s settings were, etc. It’s possible to remove all of the unnecessary data to compress the images. This reduces the file size, retains most of its quality and helps make your page load a lot faster.
Most people are scrolling through blog posts on mobile phones, so there’s really no need to force a huge, high resolution image to load. Remember, you may have a super-fast internet connection with unlimited data, but not everyone else does.
How to compress images quickly
Adobe PhotoShop – when saving your image file as a JPEG, increase the amount of compression for a smaller file.
TinyJPG.com – upload your files here to compress them, then download the smaller version when it’s finished.
WordPress Plugins – if you’d rather go down the plugin route, there are several available that will automatically compress all your images when you add them to WordPress. Here are a few recommendations:
- Smush
- EWWW
- ShortPixel – recommended method
If you need to compress your images in bulk, then the fastest way to do this is with a plugin!
Bonus Tip – Clear out your media library
Do you have any unused images in your WordPress media library? If you’re absolutely sure that you’re not using them somewhere on your site then it’s safe to delete them. Deleting these unused files will clear space from the database that powers your WordPress website!
4. Lazy loading images
The next step is to ensure that your images load ‘lazily’ instead of all at once. Pages with lots of images are going to have a bigger file size, so why is it necessary for all 20 images to load at once, when they could load on-scroll?
Every image on this website is ‘lazy loaded’, so as you scroll through an article, the images just sort-of ‘pop in’ to place. This means that you haven’t got to wait ages for every picture to load before you can interact with the page.
How to force images to load ‘lazily’
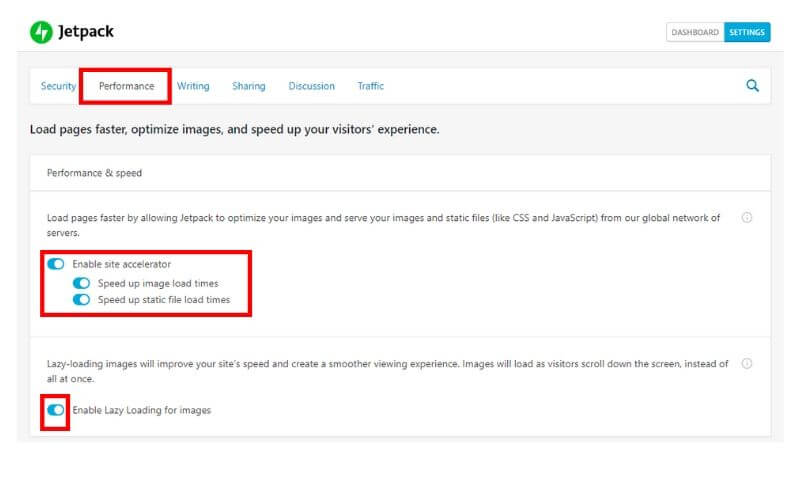
Lots of bloggers already rely on the JetPack plugin, which has a lazy load feature, but it’s disabled by default. Enabling ‘lazy load’ massively reduces page load speed and I highly recommend you use it so you can see your site load lightning fast! (many argue that the Jetpack plugin actually increases load-time, but I use it with the same setup I’m describing in this article without any problems – but almost all of its other features are disabled entirely)
5. Use a Content Delivery Network (CDN)
You already have a web host, which is the server where you website lives. But, the internet is a global communication tool and your website only lives on one server. How do you ensure that everyone gets a consistent experience when visiting your website?
A Content Delivery Network (CDN) will cache your site across a network of different servers around the world, serving the fastest version to your visitor depending on their location. This gives your visitors a far better experience and allows you to use better infrastructure that your web host provides.
You website still lives with your host, a CDN means that copies of your website are distributed around the world – in the cloud – and updated at various intervals.
Best CDN for WordPress Sites
These CDNs provide more than just fast websites, they often have web application firewalls and other security features too. With free plans available, what have you got to lose?
Stackpath – High-performance CDN for websites and web applications.
Cloudflare – A popular CDN with bloggers and content creators with free plans available.
Jetpack (Photon) – This is a free image CDN that comes with the Jetpack plugin. However, images are cached forever if you use this. So, you have to use unique file names with every single upload.
Securi – Another high-performance CDN provider that’s perfect for WordPress sites.
6. Leverage Browser Caching (Add Expires Headers)
If your site is cached, it means that visitors are served a static version of your page instead of pulling live data from your website’s database. A cached site will load much faster than an un-cached site. Your web host most likely caches your site at server-level, and you’re now using a CDN that caches your site all around the world, but are you leveraging browser caching too? In addition to using a distributed Content Delivery Network, leveraging extra layers of caching can also dramatically speed up a WordPress site, especially for repeat visitors.
When a visitor navigates to your website, the first thing its browser reads is a file called .htaccess. In this file, there are specific instructions for the browser called cache-control and expires headers. These rules tell the browser how long to store these downloaded files for. You can extend this time which results in faster load times for repeat visitors.
Some premium and managed WordPress hosting plans do this for you – so check with them before you take any action.
It’s also important to note that you should configure your settings to clear the cache of a page every time you update it or make some other change, so that your visitors are served the most up-to-date version!
How to Set Cache-Control and Expires Headers
The best way to do this is edit your own .htaccess file. You’ll need access to your website’s file manager via cPanel or FTP.
First of all, backup your existing .htaccess file once you’ve located it. Then, create a copy and open it in a text editor. Add these cache control and expires headers, for example:
## EXPIRES HEADER CACHING ##
<IfModule mod_expires.c>
ExpiresActive On
ExpiresByType image/jpg "access 1 year"
ExpiresByType image/jpeg "access 1 year"
ExpiresByType image/gif "access 1 year"
ExpiresByType image/png "access 1 year"
ExpiresByType image/svg "access 1 year"
ExpiresByType text/css "access 1 month"
ExpiresByType application/pdf "access 1 month"
ExpiresByType application/javascript "access 1 month"
ExpiresByType application/x-javascript "access 1 month"
ExpiresByType application/x-shockwave-flash "access 1 month"
ExpiresByType image/x-icon "access 1 year"
ExpiresDefault "access 2 days"
</IfModule>
## EXPIRES HEADER CACHING ##
Don’t touch any other lines of text from your .htacess file, then save and re-upload it to your server.
Those instructions were purposefully semi-technical because they assume that you’re comfortable with editing files in your website’s directory, if you’re not comfortable with this then you have two other options:
Hire an expert – I can make the necessary edits to your .htaccess file to leverage browser caching, as well as any other speed optimisation for a small fee. Get in touch to chat about this!
Use a plugin – There are several plugins available;
- WP Rocket – best paid caching plugin
- WP Fastest Cache – best free caching plugin
- W3 Total Cache
- WP Super Cache
7. Optimising your code (minify and more)
Alongside your website leveraging caching at network, server, page and browser-level, the pages that are being cached should be optimised and minified where possible.
WordPress has a lot of features that are just not needed by a lot of sites. For example, did you know that all installations of WordPress pre-load the emoji script on every single page, even if you don’t use emojis? Lots of WordPress features are geared towards bloggers, but WordPress is truly diverse in that it’s suitable for any type of website and can be scaled up.
It is possible to un-load the features of WordPress that you don’t use and optimise the code for the features that you do use. You can also strip away any unecessary HTML comments, unused CSS rules and more. All of this is likely to shave precious milliseconds off your page’s load time!
How to Optimise and Minify Code
There are several different ways of optimising your code, the best and honestly easiest way is to use a plugin. These plugins are multi-purpose as they can strip away the unnecessary HTML, remove the WordPress blogging features that you don’t use and minify CSS, JavaScript and HTML.
The following plugins will do this for you:
If you’re using any custom code, minify it fully before deploying it to your live site.
8. Defer JavaScript & Stop render blocking
If you’ve done a speed test, you’ll probably seen “Defer parsing of JavaScript” and “Avoid Render Blocking Resources”, but it doesn’t fully explain what this means and how to fix it.
I’m going to explain this as simply as possible, but it’s a little bit complicated.
Your web browser (Chrome, Safari, Firefox, Edge, etc) reads websites in HTML, which is a markup language (not a programming language), however, within that HTML code there is JavaScript tags that may reference external content, taking longer to load.
Web browsers read pages from top to bottom (logical, you see) and most website owners copy & paste JavaScript, such as Google Analytics codes into the <head> section of their page, as instructed.
This means that when the browser is parsing (reading and rendering) the page from top-to-bottom and it reaches a block of JavaScript right near the top, it will load that before loading anything below it.
Most JavaScript on blogs does not need to load in the head. It can load right at the bottom of the page, before the end of the section.
But why?
Because waiting for the browser to load in JavaScript blocks actual elements on the page from loading. The browser has to load in the JavaScript (if it’s in the header) before it even starts to load the section, which is where all of your website’s content lives.
By moving the JavaScipt right to the end of the page, the browser can load in all the important, visual content before loading in any scripts. On a fast internet connection, this could take place in hundredths of a second, but on a slow internet connection it could take upwards of 10 seconds for a page to load! So, JavaScript in the header is a Render Blocking Resource.
Defer parsing of JavaScript to the end to avoid render blocking.
How to Defer Parsing of JavaScript
You must be using WordPress with a Child Theme for this to work.
Go to your Child Theme’s functions.php file. Copy & Page the following code at the end of whatever’s already written there.
      // moves JavaScript to end
function custom_clean_head() {
remove_action('wp_head', 'wp_print_scripts');
remove_action('wp_head', 'wp_print_head_scripts', 9);
remove_action('wp_head', 'wp_enqueue_scripts', 1);
}
add_action( 'wp_enqueue_scripts', 'custom_clean_head' );
This code only defers JavaScipt and not styles, so it’s pretty much ‘set and forget’ once it’s in place. You need to thoroughly test your website after implementing this code.
It’s vital that you only do this with a Child Theme to preserve this function after your theme updates!
9. Avoid Redirect Chains
If you’ve ever changes the URL structure of your website then you hopefully setup redirects and canonicals from the old URL to the new one. A website that’s full of broken links and errors is even worse than a slow one!
Even if your directs are setup properly, you could end up with a redirect redirecting to another redirect. Rather than have Page A redirecting to Page B which redirects to Page C, setup your redirects so that Page A redirects directly to Page C. In Page Speed tests like GTMetrix, even redirecting from a www-site to a non-www-site will count as a redirect, but that’s not always in your control.
As a sidenote – you should always check that the www, non-www, https and non-https URLs all point to your preferred version. I personally prefer https:// and without the www, so https://sarahtamsin.com.
How to Fix Redirect Chains
Assuming that you already have redirects in place to cause a chain, go back to your original method for redirection. That may have been a plugin or you may have directly edited your site’s .htaccess and robots.txt files to setup the original redirects and canonicals.
Identify where any redirect targets are also being redirected and amend with the appropriate target URL.
Use a spreadsheet if you find it easier!
Most bloggers will have some form of social sharing buttons on every blog post that encourages readers to share your content on social media.
Many of the plugins used to achieve this will show the number of times it’s been shared on different platforms. Bloggers and businesses like this, especially if a piece of content has been shared a lot of times. These numbers act as social proof that a piece of content is high quality.
It’s popular, so it must be high quality, right!?
However, for most it’s just not necessary to let your audience know that your latest blog post has been shared 36 times. Every page that loads with social share counts has to connect to an external service to retrieve these numbers. Unless it’s a vanity thing, or you’re aiming to be a social media influencer, then you can turn this off to save a few precious seconds.
All of these social media sharing buttons have to connect to an external service (Facebook, Instagram, Pinterest) to retrieve these figures, which takes time to do and increase the page load time. In case you’re wondering, Twitter no longer provides share counts, in fact they turned this off ages ago. Any plugins that show the number of shares on Twitter are using another third party service.
The precise steps depend upon which plugin or service you’re using to display Social Media sharing buttons on your website. Go to the ‘settings’ page and look for an option to turn off social share counts.
11. Turn off comment avatars (or commenting all together)
The blog commenting feature is resource-heavy and loads lots of scripts that you may not even use. If you don’t use WordPress for blogging at all, then disable the comments feature and forget about it. But, if you’re a blogger and you need comments for your readers to interact with you then you’ll be surprised to know that the comment avatars can add seconds to your page’s load time!
It’s a good idea to disable these comment avatars – they’re not essential to your site’s content so you can turn them off all together! If you use another service such as Facebook or Disqus to handle your blog comments, then this is always going to add extra seconds onto your website as it’s using an external service.
How to disable avatars on WordPress blog comments
In your WordPress dashboard, navigate to Settings > Discussion. Scroll down and un-tick the box that says “Show comment avatars”.
It’s as simple as that!
12. Get better hosting!
If you’ve exhausted everything on this list and you’re still not seeing results, then sorry to say that your hosting is to blame. By 2019, most web hosts should be using HTTP/2, the older protocol (HTTP/1.1) cannot supply concurrent resources that modern web applications demand, resulting in a terrible experience for the user.
Check with your web host whether they’re using the latest HTTP/2 protocol that can handle serving multiple resources at once.
Also, cheap, shared hosting (E.g. GoDaddy, Bluehost) will unlikely use Solid State Drive (SSD) storage. This means that the server is using older technology to store your website and it therefore takes longer to lookup the data when it receives a request. In short, you need better hosting with an SSD for a modern WordPress site. You’ll really notice the difference once you upgrade.
For really large sites, consider buying dedicated or VPS instead of cheap shared hosting.
Here are your options for Premium managed WordPress Hosting – with managed hosting you don’t need to worry about [most of] the more technical of these speed tips as the host handle it all for you!
In Conclusion
If you implement these WordPress speed tips, you’ll see a noticeable improvement in your website’s loading time. Remember, if you’re using ads such as AdSense, MediaVine, Ezoic or Amazon Native ads, this is out of your control and they will slow your site down!
What other tips do you have for making WordPress websites load faster? Leave a comment with your advice and don’t forget to pin this image and save this post for future reference! ?